In this tutorial let us build an example application using ASP.NET MVC code first approach of entity framework. In our last tutorial, we have created the Code first example application, which is a console application. It is very important that you read that Tutorial first, before continuing with this Tutorial. We are going to use the same user domain class and concepts show you how to build a simple CRUD application using ASP.NET MVC.
Software Versions used in the tutorial
- Visual Studio 2015
- Entity Framework 6.2.0.
- .NET 4.5
- ASP.NET 4.5.2
Entity Framework is an ORM Framework. If you are new to Entity Framework you can find here the complete list of Tutorial on Entity Framework.
Table of Contents
Create the ASP.NET MVC Project
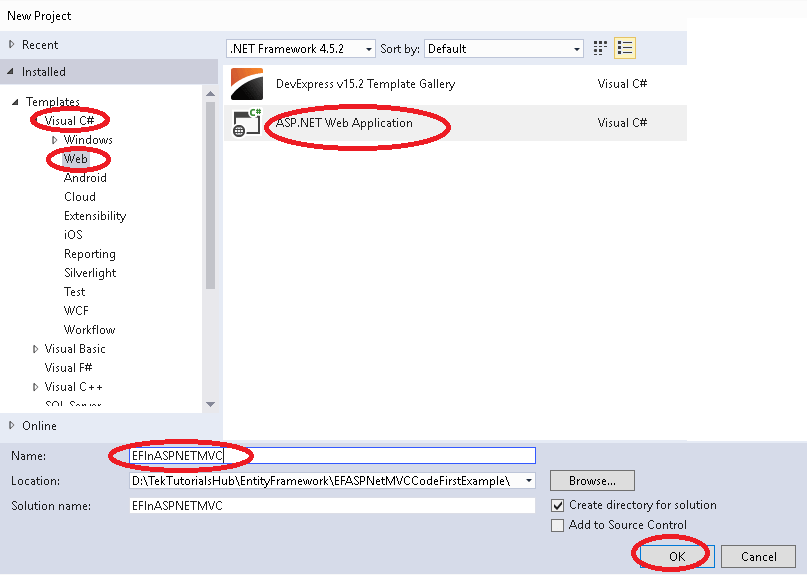
- Open Visual Studio.
- File ->New -> Project
- Select Visual C# -> Web ASP.NET Web Application. Name the Project as EFInASPNETMVC and click on OK
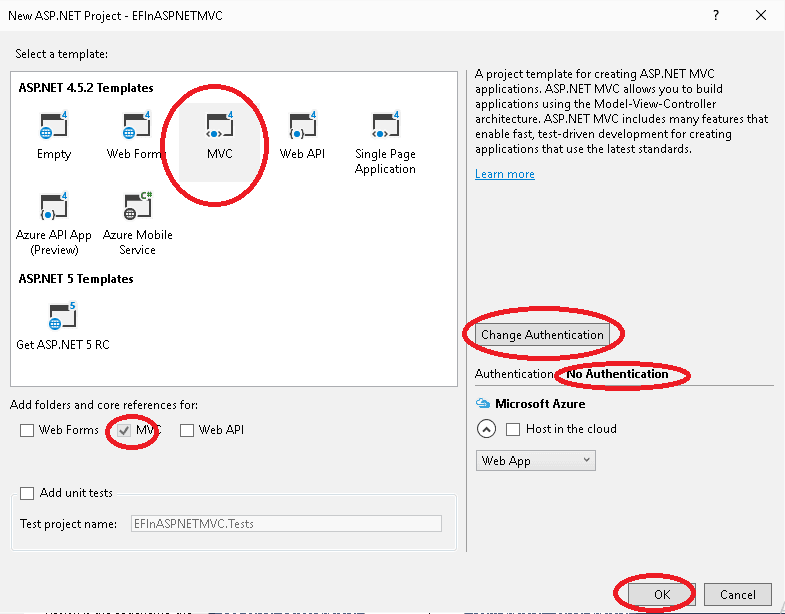
- Select MVC
- Click on Change Authentication and select No Authentication
- Click OK
The above will install the default template.
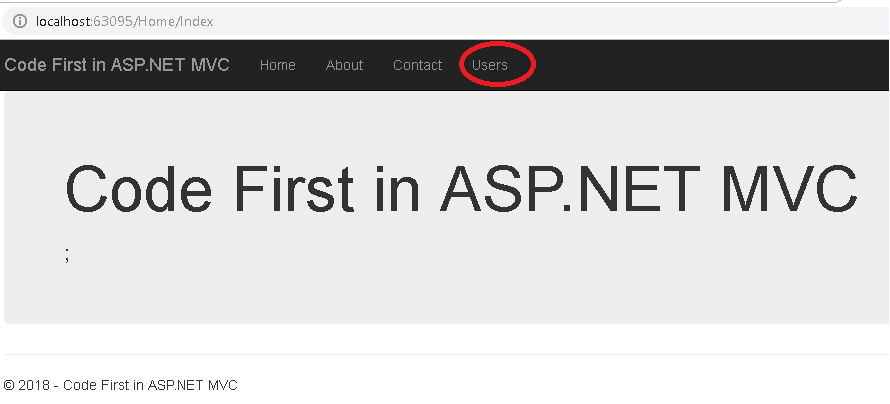
Next, Open the Views\Shared_Layout.cshtml. Locate the “Application name” and “My ASP.NET Application” to “Code First in ASP.NET MVC”
Next, under the menu entry add the following menu item for the user’s Menu
1 2 3 | <li>@Html.ActionLink("Users", "Index", "Users")</li> |
Open the Views\Home\Index.cshtml. Replace the contents of the file with the following code
1 2 3 4 5 6 7 8 9 | @{ ViewBag.Title = "Home Page"; } <div class="jumbotron"> <h1>Code First in ASP.NET MVC</h1>; </div> |
Run the application. The application should run without any error as shown below
Install Entity Framework
We looked at how to install the entity framework in the last tutorial. Go to the Package Manager Console and type the following command
1 2 3 | install-package entityframework |
This will install the latest version of the Entity Framework (6.2.0).
Entity model
The next step is to create the Entity Data Model (EDM).
- Select the Models folder
- Right click and click on Add->Class
- Name the file as model.cs
- Copy the user class which we created in the last tutorial.
1 2 3 4 5 6 7 8 9 10 11 | namespace EFInASPNETMVC.Models { public class User { public int UserID { get; set; } public string Name { get; set; } public string Email { get; set; } } } |
DbContext
The DbContext (often referred to as context) is the class which, helps us to query, insert, update and delete operations on the entities and persists them to the database, when required
Add the DBContext class to the Project using the following steps
- Select the Models folder
- Right Click -> Add -> Class
- Name the class as EFContext.cs
- Click on Add
- Import the namespace System.Data.Entity
- Make the EFContext class as public and inherit it from the DbContext class
- Add the Dbset Property for the user entity type
1 2 3 4 5 6 7 8 9 10 11 | using System.Data.Entity; namespace EFInASPNETMVC.Models { public class EFContext : DbContext { public DbSet<User> Users { get; set; } } } |
User Interface
Now let us build a simple UI Screen for our user table.
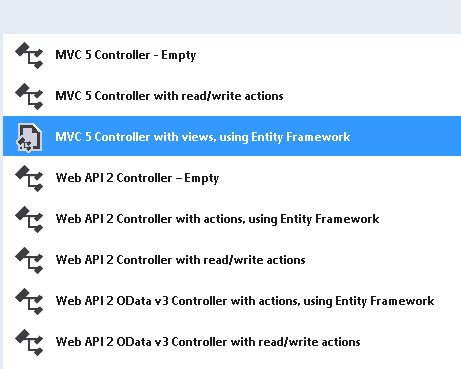
- Select the Controller folder
- Click on Add Controller.
- Select MVC 5 Controller with views, using Entity Framework
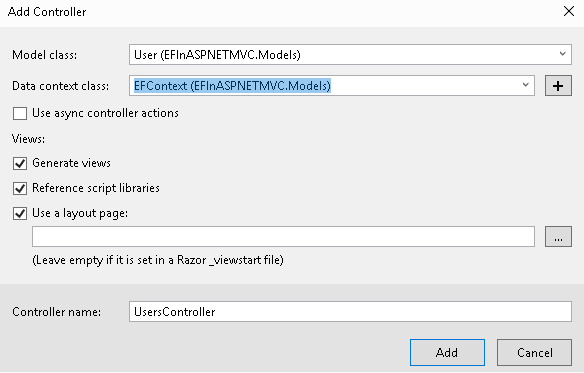
Click on Add to go to the next dialog. In the Add Controller dialog
- Select Model class as User (EFInASPNETMVC.Models)
- Select Data Context class as EFContext (EFInASPNETMVC.Models)
- Enter the controller name as UsersController and click on Add
The Visual studio scaffolding framework does an excellent job of creating CRUD operations based on our model classes.
Run The Application
Run the application. Click on the user’s menu. Add the new users using the Create new user link.
Database
The Code First generates the database in App_data folder. The name of the database is “EFInASPNETMVC.Models.EFContext” which is the fully qualified name of our DBContext class.
CRUD Operations
The ASP.MVC Does a good job of creating CRUD Operation by scaffolding the model class. Let us look at the generated code. Goto Controller folder and open the UsersController.
The Context class is initialized at the top of the class
1 2 3 | private EFContext db = new EFContext(); |
The Index Action method returns the list of Users by invoking the ToList method of the Users DbSet.
1 2 3 4 5 6 | public ActionResult Index() { return View(db.Users.ToList()); } |
The Details Actions method uses the Find method to retrieve the selected User from the database and converts it into an instance of the user entity.
1 2 3 4 5 6 7 8 9 10 11 12 13 14 15 16 | // GET: Users/Details/5 public ActionResult Details(int? id) { if (id == null) { return new HttpStatusCodeResult(HttpStatusCode.BadRequest); } User user = db.Users.Find(id); if (user == null) { return HttpNotFound(); } return View(user); } |
The Create Action method invokes the Add method of the Users DbSet to add the user to the DbSet. The SaveChanges method of the context class is called next to persist the data back to the database
1 2 3 4 5 6 7 8 9 10 11 12 13 | public ActionResult Create([Bind(Include = "UserID,Name,Email")] User user) { if (ModelState.IsValid) { db.Users.Add(user); db.SaveChanges(); return RedirectToAction("Index"); } return View(user); } |
The Entities needs to be added to the context in order to perform CRUD Operation. Here the user instance received is added to the context using the Entry method. The state of the Entity is also changed to Modified indicating that it is modified. Finally, SaveChanges is called to persist the data
1 2 3 4 5 6 7 8 9 10 11 12 | public ActionResult Edit([Bind(Include = "UserID,Name,Email")] User user) { if (ModelState.IsValid) { db.Entry(user).State = EntityState.Modified; db.SaveChanges(); return RedirectToAction("Index"); } return View(user); } |
Finally, the Delete Action method. The entity to be deleted is queried using the Find method. Next, it is removed from the context using the Remove method. The SaveChanges updates the database
1 2 3 4 5 6 7 8 9 | public ActionResult DeleteConfirmed(int id) { User user = db.Users.Find(id); db.Users.Remove(user); db.SaveChanges(); return RedirectToAction("Index"); } |
The above example code gives you a brief introduction of how CRUD operations work in ASP.NET MVC Code first applications. You can learn more about them by referring to the following tutorials
References
- Persistence in Entity Framework
- Entity States
- Adding New Entities
- Updating Records
- Deleting Records
- Entity Framework Tutorial
- LINQ To Entities Tutorial
Conclusion
In the last tutorial, we used the console application to show you how to use code first in an application. In this tutorial, we demonstrated how to build a Sample ASP.NET MVC application using the code first approach. In the next tutorial let us look at how to configure the database in Code first approach.


Hi, I cannot download the sourcecode that you attached.
best regards
If you guys can do an ASP.NET Core walk through, that would be good.
Thanks again
I am in the process of creating complete tutorial on ASP.NET Core.