In our last post Introduction to ASP.NET Identity, We had discussed features it supports. In the next few series of article on ASP.NET Identity Tutorial, we will explain to you how to build a simple login/logout and user registration page using the ASP.NET Identity Framework using Microsoft.OWIN Middleware
Table of Contents
ASP.NET Identity Tutorial
Here is the link to all the tutorials
- Introduction to ASP.NET Identity
- ASP.NET Identity Tutorial – Getting Started
- ASP.NET Identity Tutorial – OWIN Authentication Middleware
- ASP.NET Core Identity
Prepare the Project
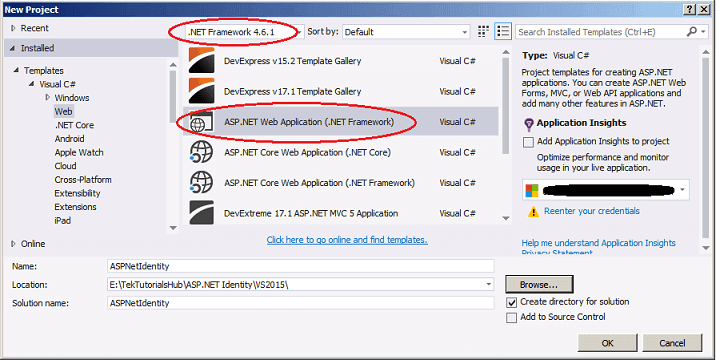
First, let us create a Project in Visual Studio. We are Using Visual Studio 2015, and the latest .NET Framework 4.6.1.
Open Visual Studio 2015 and click on New Project. Select .NET Framework 4.6.1 and ASP.NET Web Application (.NET Framework). Enter the Project name as ASPNetIdentity and then Click OK
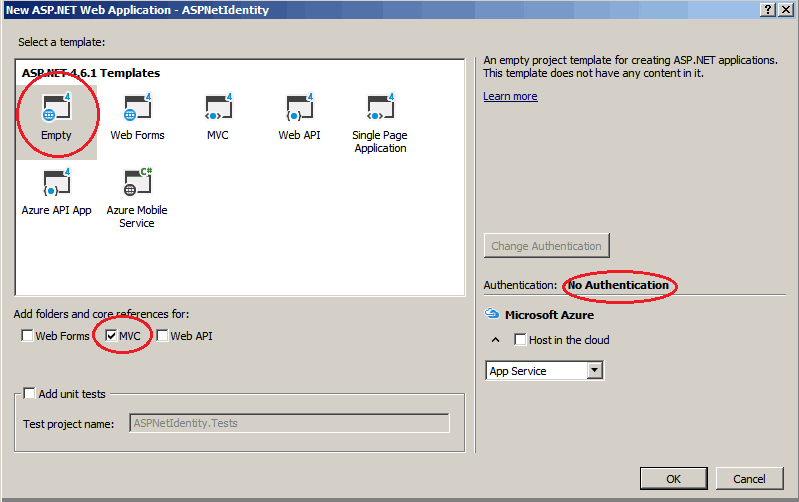
In the New ASP.NET Web Application dialogue box, choose Empty Template and select MVC. Choose No Authentication and click ok
Components of ASP.NET Identity
There are three main Components in the ASP.NET Identity
- Microsoft.AspNet.Identity.Core
- Microsoft.AspNet.Identity.EntityFramework
- Microsoft.AspNet.Identity.Owin
Microsoft.AspNet.Identity.Core
This is the Core module of the Identity System. It contains classes and interfaces related to managing users and roles for ASP.NET Identity.
Microsoft.AspNet.Identity.EntityFramework
This is an Entity Framework namespace specific to ASP.NET Identity. This has a concrete Implementation of the Interfaces defined in the Microsoft.ASPNet.Identity.Core namespace, which will persist the ASP.NET Identity data and schema to SQL Server.
Microsoft.AspNet.Identity.Owin
This package contains functionality that is used to plug in OWIN authentication with ASP.NET Identity in ASP.NET applications. The Identity System uses the Owin middleware components for Cookie Authentication and provides methods to implement external logins such as Facebook, Google and Twitter.
Installing the Components
Open the NuGet Package manager Console and install the components using the command shown below.
1 2 3 4 5 | Install-Package Microsoft.AspNet.Identity.Core Install-Package Microsoft.AspNet.Identity.EntityFramework Install-Package Microsoft.aspnet.identity.owin |
The above command will install the latest version of the components. The Latest Version at the time of writing this article is 2.2.1
The following additional dependencies are also get installed
EntityFramework 6.1.0, Newtonsoft.Json 4.5.11, Owin 1.0.0, Microsoft.Owin 2.1.0, Microsoft.Owin.Security 2.1.0, Microsoft.Owin.Security.Cookies 2.1.0 & Microsoft.Owin.Security.OAuth 2.1.0
Preparing the Database
The ASP.NET Identity uses Entity framework to connect to the database and store the user’s information. To do that, we need to create a database. Let us use the localdb to do that.
Open the web.config and add the following connection string under configuration section.
1 2 3 4 5 6 | <connectionStrings> <add name="DefaultConnection" connectionString="Data Source=(LocalDb)\MSSQLLocalDB;AttachDbFilename=|DataDirectory|\ASPNetIdentity.mdf;Initial Catalog=ASPNetIdentity;Integrated Security=True" providerName="System.Data.SqlClient" /> </connectionStrings> |
Feel free to change the Connection string as per your chosen database
IdentityUser
We need a class to represent the user, where all the user-related information’s are kept. This model class must implement the interface IUser<TKey>.
This Interface is defined in the Microsoft.AspNet.Identity namespace. It requires an ID and Name field for every user.
ID Property is a string field. The system generates a GUID and stores it as a string in this field. You can override this field with an integer or any other type
The IdentityUser is the Entity Framework implementation of the IUser<Tkey> Interface. It is in the Microsoft.AspNet.Identity.EntityFramework namespace. IdentityUser class extends the IUser interface by adding the minimum required fields for our user model.
A peek into IdentityUser class shows us the following properties
1 2 3 4 5 6 7 8 9 10 11 12 13 14 15 16 17 18 19 20 21 22 23 24 25 26 27 | public virtual string Email { get; set; } public virtual bool EmailConfirmed { get; set; } public virtual TKey Id { get; set; } public virtual bool LockoutEnabled { get; set; } public virtual DateTime? LockoutEndDateUtc { get; set; } public virtual ICollection<TLogin> Logins { get; } public virtual string PasswordHash { get; set; } public virtual string PhoneNumber { get; set; } public virtual bool PhoneNumberConfirmed { get; set; } public virtual ICollection<TRole> Roles { get; } public virtual string SecurityStamp { get; set; } public virtual bool TwoFactorEnabled { get; set; } public virtual string UserName { get; set; } |
Most of these fields are self-explanatory. We can use the IdentiyUser in our Application directly. But it is advisable to define our own class and inherit it from IdentityUser. You can add your custom fields to this class.
1 2 3 4 5 6 | public class ApplicationUser :IdentityUser { //You can extend this class by adding additional fields like Birthday } |
Copy the above code to the IdentityModels.cs under models folder
You need to import the following namespaces
1 2 3 4 | using Microsoft.AspNet.Identity; using Microsoft.AspNet.Identity.EntityFramework; |
Database Context
The Entity Framework requires DbContext, which is responsible for interacting with the entity model and the database.
Microsoft.AspNet.Identity.EntityFramework namespace implements the IdentityDbContext<TUser> which inherits from DbContext. This class provides the ready DbSets for Users and Roles.
All we need to do is inherit from the IdentityDbContext<TUser>. Here TUser is our ApplicationUser. In the constructor of the class pass the connection string to our database.
1 2 3 4 5 6 7 8 9 10 | public class ApplicationDbContext : IdentityDbContext<ApplicationUser> { public ApplicationDbContext() : base("DefaultConnection", throwIfV1Schema: false) { } } |
Copy the above code to the IdentityModels.cs under model folder
Configuring ASP.NET Identity
Next, we need to configure the Identity to use UserManager and UserStore.
Let us create class IdentityConfig.cs under the App_start folder as shown below. Remove the App_start from the namespace.
1 2 3 4 5 6 7 8 9 10 11 | using System; using System.Collections.Generic; using System.Linq; using System.Web; namespace ASPNetIdentity { } |
User Store
User store provides the methods to persist the user, user roles, user claims etc to the database.
The UserStore class must implement the IUserStore interface. The interface is defined in the Microsoft.AspNet.Identity namespace. A peek into interface will show us the following
1 2 3 4 5 6 7 8 9 10 | Interface" >public interface IUserStore<TUser, in TKey> : IDisposable where TUser : class, Microsoft.AspNet.Identity.IUser<TKey> { Task CreateAsync(TUser user); Task DeleteAsync(TUser user); Task<TUser> FindByIdAsync(TKey userId); Task<TUser> FindByNameAsync(string userName); Task UpdateAsync(TUser user); } |
It has defined 5 interfaces, which specifies how to Create a new user, Update an existing user, Delete a user, Find a user by ID and Find a user by username
The user store can also optionally implement the following interfaces
- IUserLoginStore
- IUserClaimStore
- IUserRoleStore
- IUserPasswordStore
- IUserSecurityStampStore
- IQueryableUserStore
- IUserEmailStore
- IUserPhoneNumberStore
- IUserTwoFactorStore
- IUserLockoutStore
The Microsoft.AspNet.Identity.EntityFramework defines the UserStore class, which is a concrete implementation of the IUserStore
In the constructor of the UserStore, requires us to pass the DBContext, so that it knows how to persist the data
Let us create ApplicationUserStore inheriting from the UserStore<ApplicationUser> as shown below.
1 2 3 4 5 6 7 8 9 10 11 12 | using ASPNetIdentity.Models; using Microsoft.AspNet.Identity.EntityFramework; using Microsoft.AspNet.Identity; public class ApplicationUserStore : UserStore<ApplicationUser> { public ApplicationUserStore(ApplicationDbContext context): base(context) { } } |
Copy the above code to IdentityConfig.cs under App_start folder
If you don’t want to use Entity Framework for your models or you want to implement your own version of persistence mechanism and then this is where you write your own implementation of the store. All you need to do is Implement the IUserStore Interface. Then pass the class in the constructor of UserManager.
User Manager
The UserManager<TUser> is a concrete class that manages the user. It is defined in the Microsoft.AspNet.Identity namespace. This Class Creates, Updates, and Deletes the Users. It has methods to find a user by ID, User Name and email. It also provides the functionality for adding Claims, removing claims, add and removing roles, etc. It also generates password hash, Validates Users etc.
UserManager<TUser> uses the user store to connect to the database.
UserStore must be passed to the UserManager in its Constructor. You can pass any object that implements IUserStore interface.
User Manager knows nothing about the store. Such a decoupling helps you to write your own version of the persistent mechanism.
We implement our own User manager ApplicationUserManager by deriving it from the UserManager<TUser>. This helps us to extend the functionality at the later stage
In the constructor of the UserManager we pass the user store ( IUserStore<ApplicationUser> ).
1 2 3 4 5 6 7 8 | public class ApplicationUserManager : UserManager<ApplicationUser> { public ApplicationUserManager(IUserStore<ApplicationUser> store): base(store) { } } |
Copy the above code to IdentityConfig.cs under App_start folder
HomeController
We have got the required classes in place. Let us now try to add a user and test it.
We will create a method in HomeController to create a new user. To do that we will create a method called addUser in our controller
Select Controllers folder, right click and click on Add-> Controller. Select MVC5 Controller – Empty Template. Name the Controller as HomeController.
Now, Right click on the Index Action method and click on Add View to add the View. Choose Template as Empty (without model) and check Use a Layout Page.
Add the following code in the Index View
1 2 3 | @Html.ActionLink("Add User", "AddUser", "Home") |
Open the HomeController and copy paste the following code
1 2 3 4 5 6 7 8 9 10 11 12 13 14 15 16 17 18 19 20 | public async Task<string> AddUser() { ApplicationUser user; ApplicationUserStore Store = new ApplicationUserStore(new ApplicationDbContext()); ApplicationUserManager userManager = new ApplicationUserManager(Store); user = new ApplicationUser { UserName = "TestUser", }; var result = await userManager.CreateAsync(user); if (!result.Succeeded) { return result.Errors.First(); } return "User Added"; } |
Lets, now look at the code in more detail
First, we have created user variable which will hold the ApplicationUser Instance.
1 2 3 | ApplicationUser user; |
Next, we have a store variable which holds the instance of ApplicationUserStore. Note that we are passing the ApplicationDbContext to the store so that it knows about the database.
1 2 3 | ApplicationUserStore Store = new ApplicationUserStore(new ApplicationDbContext()); |
Finally, userManager is created by passing the store to it.
1 2 3 | ApplicationUserManager userManager = new ApplicationUserManager(Store); |
In the Next step, we create a new user
1 2 3 4 5 6 7 |
We, then pass it to userManager.CreateAsync(user). userManager.CreateAsync validates the user for duplication and if everything is ok then it inserts the user into the database. It uses Store Manager, which in turn uses the entity framework to persist the data to the database
1 2 3 | var result = await userManager.CreateAsync(user); |
The User Manager returns the IdentityResult. The IdentityResult has a property Succeeded which returns a boolean value indicating the success of the operation. It also has Errors Property which returns the list of errors.
1 2 3 4 5 6 | if (!result.Succeeded) { return result.Errors.First(); } |
On successful creation of user, the browser will display the “User Added” message
1 2 3 | return "User Added"; |
Run and Test
Finally, run the application and click on the AddUser link. If everything is fine you should be able to see the “User Added” message.
Identity Tables
Open the database, you will find that the following tables are automatically added by the Identity system

- AspNetUsers
Stores Users Information like login name, password etc - AspNetRoles
Stores User Roles - AspNetUserRoles
Associates Particular roles to User - AspNetUserLogins
This table to hold information about 3rd party/external logins like facebook, google etc - AspNetUserClaims
Stores Claims associated with the user
Open the AspNetUsers table and you will see that the user TestUser is added to the table. If you run the application again you will get the error message “Name is already taken.” error message.
The ASP.NET Identity Architecture
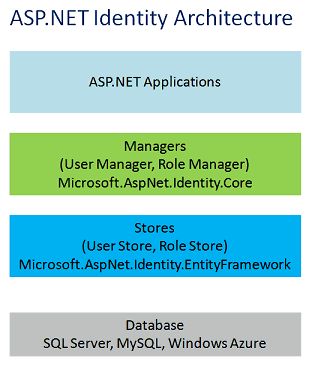
Now, let’s recap what we did. The following picture shows how the ASP.NET identity Architecture
Managers
ASP.Net Identity has high-level classes called Managers, which is used by our application to manage Identity models like users, roles, claims etc. Currently, ASP.NET Identity Provides two managers. UserManger andRoleManager
Identity Models
The Identity Models represent the domain model. ASP.NET Identity provides the basic Interface for these models. For Example, IUser Interface for User Model and IRole for Roles, IClaim for Claims.
Use Store
The Managers uses the UseStore to talk to the Stores. The stores define how the users, roles are persisted to the database. The User Manager is decoupled from the UserStore.
This decoupling enables us to create our own implementation of User Store
The ASP.Net Identity brings its own default implementation of Use Store in Using Entity Framework in the namespace Microsoft.AspNet.Identity.EntityFramework. This Framework defines the Concrete implementation of the User Store specific to Entity Framework. It also has concrete classes for Identity Models.
Registering the Users
Now, let us go ahead and complete the User Registration View
RegisterViewModel
Goto Model folder and add the AccountViewModels.cs. Add the following Code
1 2 3 4 5 6 7 8 9 10 11 12 13 14 15 16 17 18 19 20 21 22 23 24 25 26 27 28 29 30 31 | using System; using System.Collections.Generic; using System.ComponentModel.DataAnnotations; using System.Linq; using System.Web; namespace ASPNetIdentity.Models { public class RegisterViewModel { [Required] [EmailAddress] [Display(Name = "Email")] public string Email { get; set; } [Required] [StringLength(100, ErrorMessage = "The {0} must be at least {2} characters long.", MinimumLength = 6)] [DataType(DataType.Password)] [Display(Name = "Password")] public string Password { get; set; } [DataType(DataType.Password)] [Display(Name = "Confirm password")] [Compare("Password", ErrorMessage = "The password and confirmation password do not match.")] public string ConfirmPassword { get; set; } } } |
AccountController
Goto Controller folder and add the AccountController.cs
1 2 3 4 5 6 7 8 9 10 11 12 13 14 15 16 17 18 19 20 21 22 23 24 25 26 27 28 29 30 31 32 33 34 35 36 37 38 39 40 41 42 43 44 45 46 47 48 49 50 51 52 53 54 55 56 57 58 | using ASPNetIdentity.Models; using Microsoft.AspNet.Identity; using Microsoft.AspNet.Identity.EntityFramework; using System; using System.Collections.Generic; using System.Linq; using System.Threading.Tasks; using System.Web; using System.Web.Mvc; namespace ASPNetIdentity.Controllers { public class AccountController : Controller { // // GET: /Account/Register [AllowAnonymous] public ActionResult Register() { return View(); } // // POST: /Account/Register [HttpPost] [AllowAnonymous] [ValidateAntiForgeryToken] public async Task<ActionResult> Register(RegisterViewModel model) { if (ModelState.IsValid) { var user = new ApplicationUser { UserName = model.Email, Email = model.Email }; UserStore<ApplicationUser> Store = new UserStore<ApplicationUser>(new ApplicationDbContext()); ApplicationUserManager userManager = new ApplicationUserManager(Store); var result = await userManager.CreateAsync(user, model.Password); if (result.Succeeded) { return RedirectToAction("Index", "Home"); } AddErrors(result); } // If we got this far, something failed, redisplay form return View(model); } private void AddErrors(IdentityResult result) { foreach (var error in result.Errors) { ModelState.AddModelError("", error); } } } } |
Register View
Right-click on the Register Action method to create the view. and choose an empty template
1 2 3 4 5 6 7 8 9 10 11 12 13 14 15 16 17 18 19 20 21 22 23 24 25 26 27 28 29 30 31 32 33 34 35 36 37 | @model ASPNetIdentity.Models.RegisterViewModel @{ ViewBag.Title = "Register"; } <h2>@ViewBag.Title.</h2> @using (Html.BeginForm("Register", "Account", FormMethod.Post, new { @class = "form-horizontal", role = "form" })) { @Html.AntiForgeryToken() <h4>Create a new account.</h4> <hr /> @Html.ValidationSummary("", new { @class = "text-danger" }) <div class="form-group"> @Html.LabelFor(m => m.Email, new { @class = "col-md-2 control-label" }) <div class="col-md-10"> @Html.TextBoxFor(m => m.Email, new { @class = "form-control" }) </div> </div> <div class="form-group"> @Html.LabelFor(m => m.Password, new { @class = "col-md-2 control-label" }) <div class="col-md-10"> @Html.PasswordFor(m => m.Password, new { @class = "form-control" }) </div> </div> <div class="form-group"> @Html.LabelFor(m => m.ConfirmPassword, new { @class = "col-md-2 control-label" }) <div class="col-md-10"> @Html.PasswordFor(m => m.ConfirmPassword, new { @class = "form-control" }) </div> </div> <div class="form-group"> <div class="col-md-offset-2 col-md-10"> <input type="submit" class="btn btn-default" value="Register" /> </div> </div> } |
The Layout View
Open the Views -> Shared -> _Layout.cshtml and replace the code with the following code
1 2 3 4 5 6 7 8 9 10 11 12 13 14 15 16 17 18 19 20 21 22 23 24 25 26 27 28 29 30 31 32 33 34 35 36 37 38 39 40 41 | <!DOCTYPE html> <html> <head> <meta charset="utf-8" /> <meta name="viewport" content="width=device-width, initial-scale=1.0"> <title>@ViewBag.Title - My ASP.NET Application</title> <link href="~/Content/Site.css" rel="stylesheet" type="text/css" /> <link href="~/Content/bootstrap.min.css" rel="stylesheet" type="text/css" /> <script src="~/Scripts/modernizr-2.6.2.js"></script> </head> <body> <div class="navbar navbar-inverse navbar-fixed-top"> <div class="container"> <div class="navbar-header"> <button type="button" class="navbar-toggle" data-toggle="collapse" data-target=".navbar-collapse"> <span class="icon-bar"></span> <span class="icon-bar"></span> <span class="icon-bar"></span> </button> @Html.ActionLink("Application name", "Index", "Home", new { area = "" }, new { @class = "navbar-brand" }) </div> <div class="navbar-collapse collapse"> @Html.Partial("_LoginPartial") </div> </div> </div> <div class="container body-content"> @RenderBody() <hr /> <footer> <p>© @DateTime.Now.Year - My ASP.NET Application</p> </footer> </div> <script src="~/Scripts/jquery-1.10.2.min.js"></script> <script src="~/Scripts/bootstrap.min.js"></script> </body> </html> |
Login View
Open the Views -> Shared folder and create a Partial View _LoginPartial.cshtml and add the code with the following code
1 2 3 4 5 6 7 8 9 10 11 12 13 14 15 16 17 18 19 20 21 22 23 24 | @using Microsoft.AspNet.Identity @if (Request.IsAuthenticated) { using (Html.BeginForm("LogOff", "Account", FormMethod.Post, new { id = "logoutForm", @class = "navbar-right" })) { @Html.AntiForgeryToken() <ul class="nav navbar-nav navbar-right"> <li> @Html.ActionLink("Hello " + User.Identity.GetUserName() + "!", "Index", "Manage", routeValues: null, htmlAttributes: new { title = "Manage" }) </li> <li><a href="javascript:document.getElementById('logoutForm').submit()">Log off</a></li> </ul> } } else { <ul class="nav navbar-nav navbar-right"> <li>@Html.ActionLink("Register", "Register", "Account", routeValues: null, htmlAttributes: new { id = "registerLink" })</li> <li>@Html.ActionLink("Log in", "Login", "Account", routeValues: null, htmlAttributes: new { id = "loginLink" })</li> </ul> } |
That’s it.
Now, you can register users using the application
Conclusion
We learned the basics of ASP.NET Identity system in this tutorial. We Started from scratch and installed required components liked Microsoft.AspNet.Identity.Core, Microsoft.AspNet.Identity.EntityFramework, and Microsoft.AspNet.Identity.Owin.
We then configured our Identity Model, Created User Manager and Stores Manager. Next, We added Add Button and added a user to the database.
Finally, we created Register View to complete the User Registration Process.
In the next, tutorial we will look at how to configure and use the OWIN Authentication middleware.
Here is the link to all the tutorials
- Introduction to ASP.NET Identity
- ASP.NET Identity Tutorial – Getting Started
- ASP.NET Identity Tutorial – OWIN Authentication Middleware
- ASP.NET Core Identity



非常感谢~Thank you very much,this article explains the profound in simple terms and through a step-by-step way and help me a lot
this article is vary nice
What an explanation!! Simply superb. This is the only and most detailed tutorial available on internet for OWIN. So thankful to you
I’ve followed every step but the Identity tables are not being created.
How to create them on an existing database?
Thanks a whole lot
Thanks
do you have a video on that topic
Thank you very much sir!!!
This article is awesome . Great Work , Keep doing this.
d
Thank You So Much Sir.
my name is peyman this article is very very usefull
thank you very much
Sarvari.P
[email protected]