This is the first of the four tutorials in which we are going to discuss how to create ASP.NET MVC Application using C#. Here are the links to other tutorials
- Create ASP.NET MVC Application – Add View
- Create ASP.NET MVC Application – Add Model
- Create ASP.NET MVC Application -Add CRUD Functionality
In this Tutorial we are going to create an MVC application and return a string “Hello, world” from our controller and display it in our browser.
Table of Contents
Create ASP.NET MVC Application
What is MVC
ASP.NET MVC is a framework used for building web-based application design. It consists of three main components. A Controller which controls the application flow. The View which is responsible for user interface and Model which represents the data. We have a nice article which MVC Design pattern which you can refer.
How to Create ASP.NET MVC Application
To Create ASP.NET MVC Application you need to follow these steps
- Open Visual Studio and Create empty MVC application.
- Add Controller
- Return “Hello World” from the Controller.
We are also going to analyse the code and explain how it works.
Create a Project
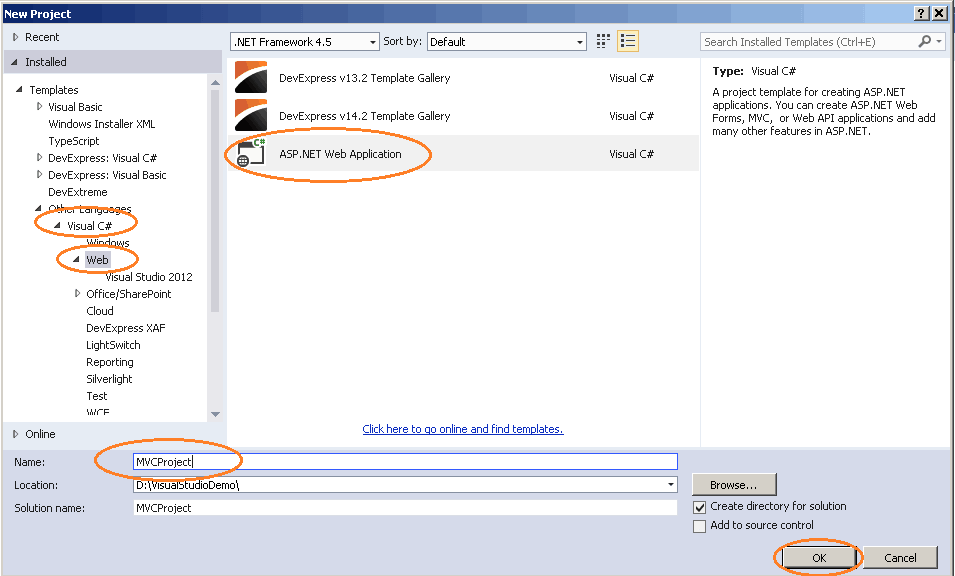
- Open Visual Studio.
- File -> New Project.
- Choose Visual C#.
- Select Web.
- Select ASP.NET Web Application.
- Name the Project as MvcHelloWorld.
- Click on OK.
This will take you to New ASP.NET Project window.
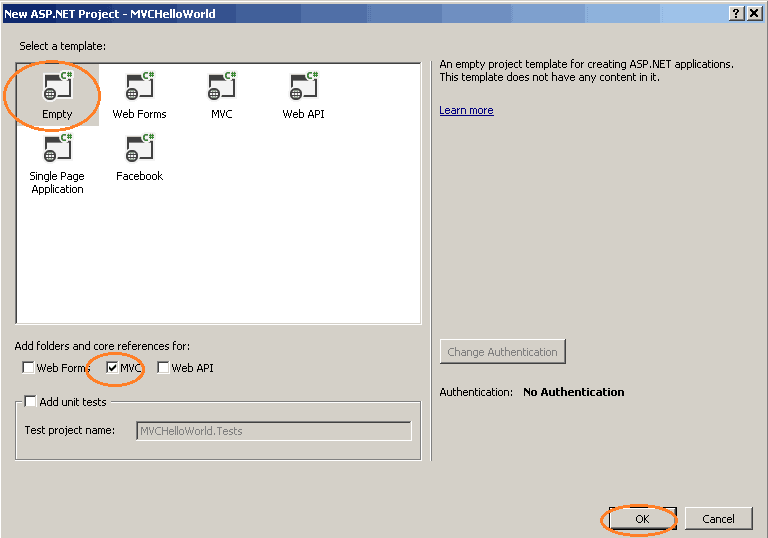
- Select Empty.
You can choose MVC Option here, which will create the MVC Project with the predefined template. For this example, let us choose the Empty template. - Select MVC.
- Click OK.
This will create the new project MVCHelloWorld.
MVC Project Folders
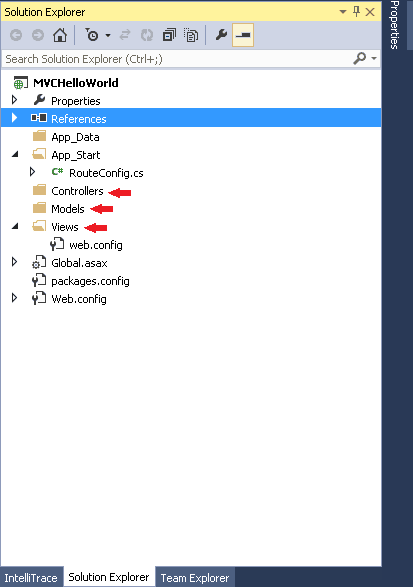
You can see from the above that ASP.NET MVC has created several project folders under the project MVCHelloWorld. Here is the brief explanation of each folder.
App_Data is where the application data is stored.
Content is where files such as cascading style sheet files, images, icons are stored. Content folder is not created in our project as we had opted for an empty project.
App_start is the location for configuration files of the MVC applications. In our project, you can see RouteConfig.cs.
Scripts are the location for javascript files that application needs. This folder is not created as we have chosen empty project.
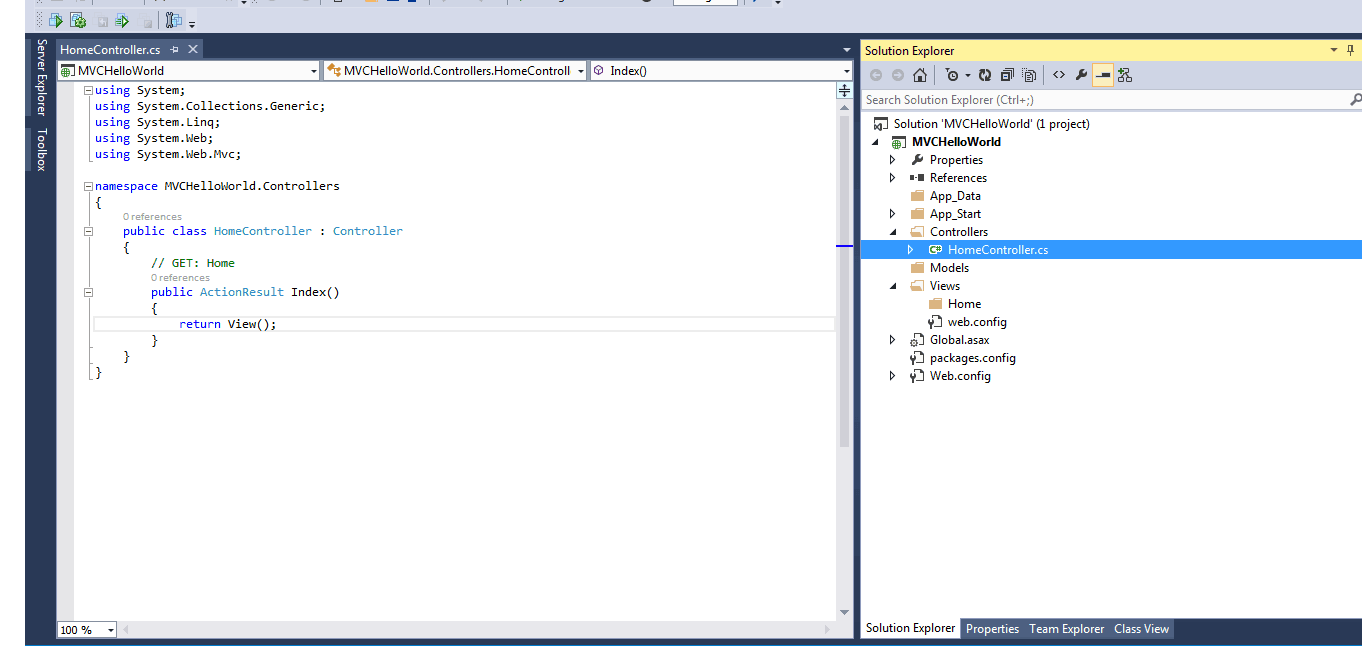
Controllers folder is the location for MVC controllers. Controllers are responsible for user actions. It is required of the MVC that the names of all controllers must end with the word “Controller”. For Example HomeController, UserController etc.
Models is the location for the model classes which will represent applications data
Views is the location for MVC views.
Add Controller
In ASP.NET MVC function of Controller is to react to the user input and present the appropriate page (View in MVC) to the user. Let us now create a Controller.
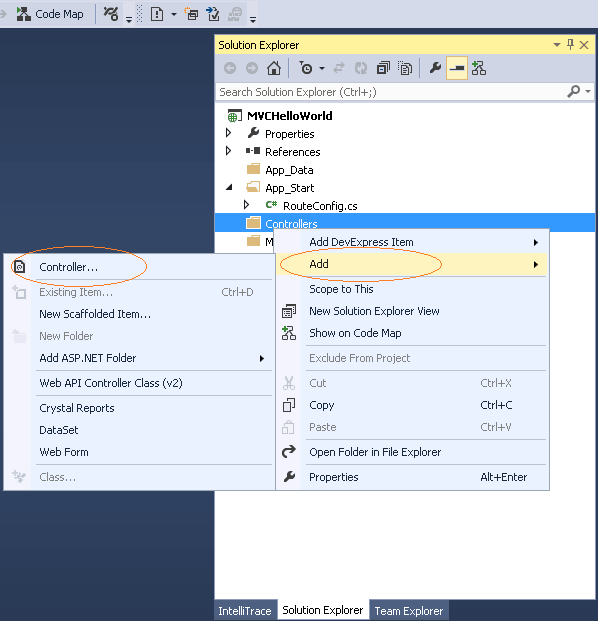
- Select Controller Folder.
- Right Click
- Click on Add -> Controller
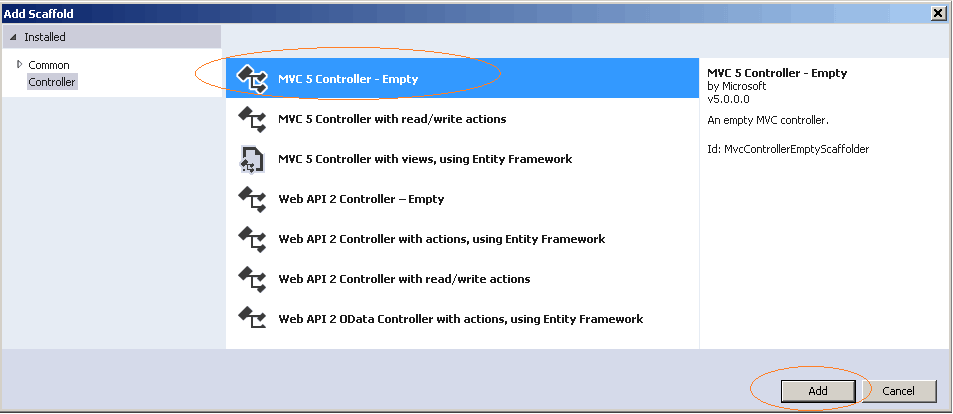
This will take you to the Add Scaffold Dialog box
- From the available templates Select MVC 5 Controller Empty.
- Click on Add. This will open Add Controller dialog box.

- Name the controller as HomeController.
Note that the Controller name ends with Controller. This is the Convention followed by the ASP.NET MVC to identify controllers. - Click on Add.

- HomeController is added to our application.
HomeController
The following code is automatically added to the HomeController by the visual studio.
1 2 3 4 5 6 7 8 9 10 11 | public class HomeController : Controller { // GET: Home public ActionResult Index() { return View(); } } |
Let us look at the code closely.
1 2 3 | public class HomeController : Controller |
HomeController class is inherited from the Controller class. This class resides in System.Web.MVC Namespace. All Controllers in ASP.NET MVC must inherit from Controller Class
1 2 3 4 5 6 7 8 | public ActionResult Index() { return View(); } |
What is a Action Method
The Public methods which are added to the Controller are called Action Methods, meaning that you can perform some actions by invoking these Methods. In the above code Index is an Action Method, which returns ActionResult.
What is a ActionResult
The return type of a Action Method (Controller method) is called ActionResult. In the above code Index method is called Action Method. The Return type of index method is called ActionResult. In the above code Index method returns View
We are yet do define any Views in our Project. If you run the above code you will see an error message (Resource not found).
Hello world
Now let us change Index method returns a “Hello, World”. Replace the Index method with the following
1 2 3 4 5 6 7 | public string Index() { return "Hello, World"; } |
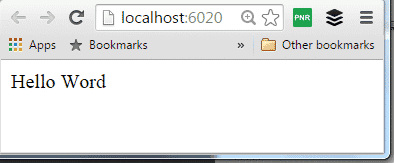
Run the Project and you should be seeing “Hello, world” in your browser.
Under the hood
Let’s analyze what just happened here.
- When we ran our web application we initiated the request for the root page
- The request was passed to HomeController.
How did our application know the request was to be passed to HomeController?. That is because MVC Application sets up HomeController as the default controller. If nothing is specified in our url, then the request is passed to the HomeController. - HomeController calls its action method Index
Again, here we have not specified any action method in our url. Our application picked up Index action method because the index is setup as the default action method. - Index action method returns “Hello World” to the browser
- browse displays the “Hello World”
Conclusion
We have successfully learnt how to create ASP.NET MVC application. In the next tutorial we will take this further and add a View to this Project. You can read the tutorial from the link
- Create ASP.NET MVC Application – Add View
- Create ASP.NET MVC Application – Add Model
- Create ASP.NET MVC Application -Add CRUD Functionality
Before jumping to the next tutorial you can try the following
- Add a another Action Method to the HomeController.
- Add a another controller.
In case of any issues or if you did not understand any of the points covered in the tutorials don’t hesitate to write in the comment section below.
Do not forget to share this post on Facebook so that it will help others.

