In this tutorial, we will show you how to set up an Angular Environment Variables for the various environments. First, we will learn where Angular keeps its environment Variable. Next, we will create a new environment variable. We then assign different values to this environment variable based on the environment. Finally, we read these values in Angular Application. We also learn how to add a new test environment.
Table of Contents
What is Angular Environment
Most apps go through different stages before they go into production. These stages may be development, testing, staging, and production. We call these stages as Environment. All these Environments require different setups & configuration. For Example, while you build the app for production, we need our app to be optimized, minified and uglified. For development, we do not want any of them but want the app to log all kinds of debugging information.
What is Angular Environment Variable
The Environment Variable are those variables, whose value changes as per the environment we are in. This will help us to change some behavior of the App based on the environment.
For Example, You may want to use different API Endpoints for production, testing, and development. Or you do not want to send those log messages to console in the production environment.
Where is Angular Environment Variable
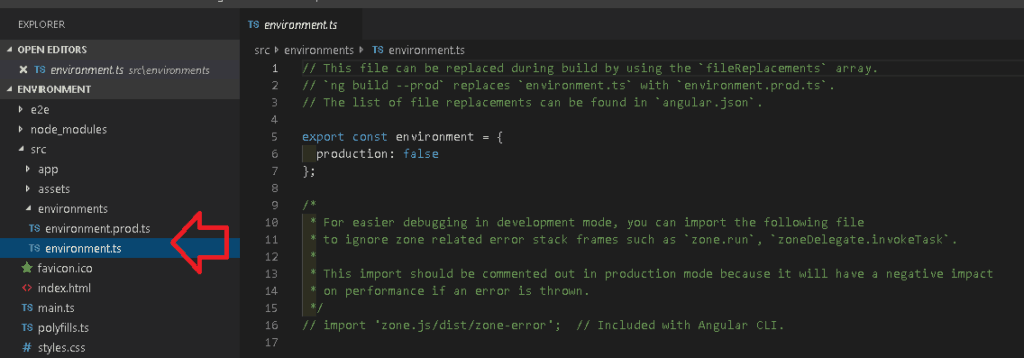
The Angular provides built-in support to configure and manage environment variables. It keeps the environment configuration under the folder src/environments folder

The folder contains two files one in environment.ts & the other one is environment.prod.ts
Out of the box, Angular provides support for the development & production environment. The default is the development and uses the environment.ts The production environment uses the environment.prod.ts file.
If you open the above files, you will find the following code.
1 2 3 4 5 6 7 | //environment.ts export const environment = { production: false }; |
1 2 3 4 5 6 7 8 | //environment.prod.ts export const environment = { production: true }; |
The file has only one variable declared. The production variable, which is set to true in environment.prod.ts and false in the other
How to Create Environment Variable
Creating a new environment variable is very simple. Add the new environment variable to all the environment files.
For Example, to have a different apiEndPoint, add the variable to each and every environment files as shown below
1 2 3 4 5 6 7 8 | //environment.ts export const environment = { production: false, apiEndPoint:"https://api.development.example.com" }; |
1 2 3 4 5 6 7 8 9 | //environment.prod.ts export const environment = { production: true, apiEndPoint:"https://api.production.example.com" }; |
How To Read the Environment Variable
Now, we have a new environment variable, we want to read it in our app.
First, import the default environment in the component. Note that you should not import any other environment files like environment.prod, but only the default environment file.
1 2 3 | import { environment } from '../environments/environment'; |
Next, read the value as shown below.
1 2 3 4 5 6 | apiEndPoint:string=""; constructor() { this.apiEndPoint = environment.apiEndPoint; } |
Testing the Environment Variable
ng serve
The ng serve command builds the app in memory and serves them via the local development server.
Run the app using the ng serve. This will build the app using the default or development environment variable. And you should see the https://api.development.example.com in your console window.
1 2 3 | ng serve |
Use the --configuration="production" option will force the serve command to build the app using the production configuration. Using the production configuration switches the environment file to environment.prod. And you should see https://api.production.example.com in your console window.
1 2 3 | ng serve --configuration="production" |
ng Build
We use ng build to build the app before distributing it. it will only build the app and copies the final output to the dist folder. It does not serve the app like ng serve does.
ng build uses the default environment i.e. development environment.
The ng build --prod or (ng build --configuration="production") uses the production environment.
How does Angular know to switch files?
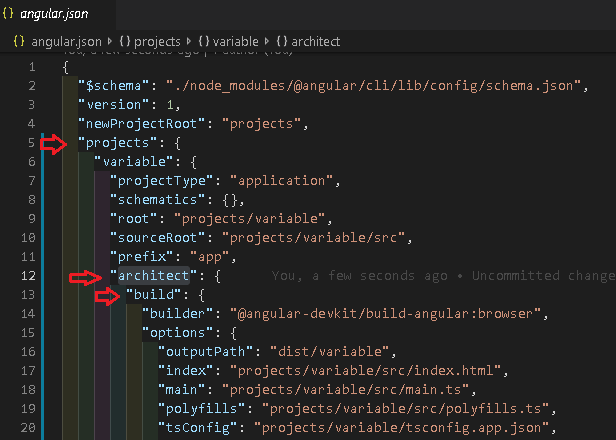
It does not. It is our job to tell angular which files to use for each environment. We do that in Angular.Json file.
All the build related configuration to the app is stored under the node projects -> <name> -> architect -> build.

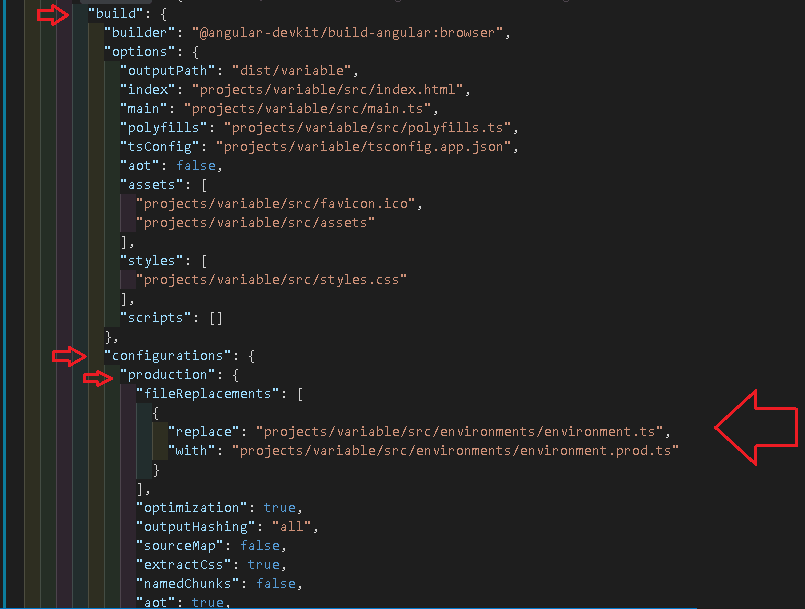
The build -> configuration -> production node is where all our configuration for the production build exits.
The fileReplacements section is where all the magic happens. It tells the angular compiler to replace the environment.ts with the environment.prod.ts, when the production configuration is used.
1 2 3 4 5 6 7 8 9 | "production": { "fileReplacements": [ { "replace": "projects/variable/src/environments/environment.ts", "with": "projects/variable/src/environments/environment.prod.ts" } ], |

Create our own configuration
We can create our own environment easily. Let us add the test configuration.
First, go to app->environments folder and create a new environment file. You can actually name the file whatever you want, but let us stick to the convention and name it as environment.test.ts.
1 2 3 4 5 6 | export const environment = { production: false, apiEndPoint:"https://api.test.example.com" }; |
Next, we need to create a test node under the build ->configurations section as shown below. Add the fileReplacements section which instructs the compiler to use the environment.test.ts when in test configuration.
1 2 3 4 5 6 7 8 9 10 11 12 13 14 | "configurations": { "production": { //Removed to make code smaller }, "test" : { "fileReplacements": [ { "replace": "projects/variable/src/environments/environment.ts", "with": "projects/variable/src/environments/environment.test.ts" } ] } |
The above is sufficient if we want to use the configuration with the command ng build --configuration="test". But if you want it to work with the ng serve then. we need to add the test node under architect->serve->configurationsnode with the following "browserTarget": "variable:build:test"
Note that the variable is the name of the app. You need to replace it with the name you have given to your app.
1 2 3 4 5 6 7 8 9 10 11 12 13 14 15 16 17 18 | "architect": { "build": { }, "serve": { "builder": "@angular-devkit/build-angular:dev-server", "options": { "browserTarget": "variable:build" }, "configurations": { "production": { "browserTarget": "variable:build:production" }, "test": { "browserTarget": "variable:build:test" } } |
Now, run ng serve --configuration="test" and you should see the https://api.test.example.com in your console window
References
Summary
In this article. we learned what is Angular Environment Variable is and how to add a new environment variable and read it in our Angular App.


We read only how to access it and add it but didn’t get its actual use.
well for example, you read the api endpoint into a variable and use that in your api calls…like he explains above..if its configured as development it uses a different endpoin and so on
Great! Thank you a lot.