In this guide let us learn how to make use of @input, @output & EventEmitter in Angular. We use these decorators to pass data from parent to child component & vice versa. @Input defines the input property in the component, which the parent component can set. The @output defines the output property (event), which we raise in the child component using the EventEmitter. The parent listens to these events.
Table of Contents
@input, @output & Eventemitter
@input
Input decorator marks the property as the input property. I.e it can receive data from the parent component. The parent component uses the property binding to bind it to a component property. Whenever the value in the parent component changes angular updates the value in the child component.
Example
Consider the following component class
1 2 3 4 5 6 7 8 9 10 | @Component({ selector: 'app-customer-detail', templateUrl: './customer-detail.component.html', styleUrls: ['./customer-detail.component.css'] }) export class CustomerDetailComponent implements OnInit { @Input() customer:Customer; } |
We have Input decorator on the customer property. The component expects that the parent component will supply its value.
The parent component supplies the customer object using the property binding syntax. We add a square bracket around the customer property. Assign template expression (selectedCustomer) to it, which is a property in the parent component.
1 2 3 | <app-customer-detail [customer]="selectedCustomer"></app-customer-detail> |
@output
Output decorates the property as the output property. We initialize it as an EventEmitter. The child component raises the event and passes the data as the argument to the event. The parent component listens to events using event binding and reads the data.
Example
1 2 3 4 5 6 7 8 9 | //Declare the property @Output() customerChange:EventEmitter<Customer> =new EventEmitter<Customer>(); //Raise the event to send the data back to parent update() { this.customerChange.emit(this.customer); } |
The customerChange is the Output property and is of type EventEmitter.
In the parent component, we subscribe to the event using the event binding syntax. Use the () around the event name (customerChange) and assign a template statement (update($event)) to it. It receives the data in the $event argument.
1 2 3 | <app-customer-detail [customer]="selectedCustomer" (customerChange)="update($event)"></app-customer-detail> |
Remember you must use the argument name as $event.
EventEmitter
EventEmitter is responsible for raising the event. The @output property normally is of type EventEmitter. The child component will use the emit() method to emit an event along with the data.
1 2 3 4 5 6 7 8 9 | //Define output property @Output() customerChange:EventEmitter<Customer> =new EventEmitter<Customer>(); //Raise the event using the emit method. update() { this.customerChange.emit(this.customer); } |
Now let us build an app to learn how to use Input, output & EventEmitter
@input, @output & Eventemitter Example
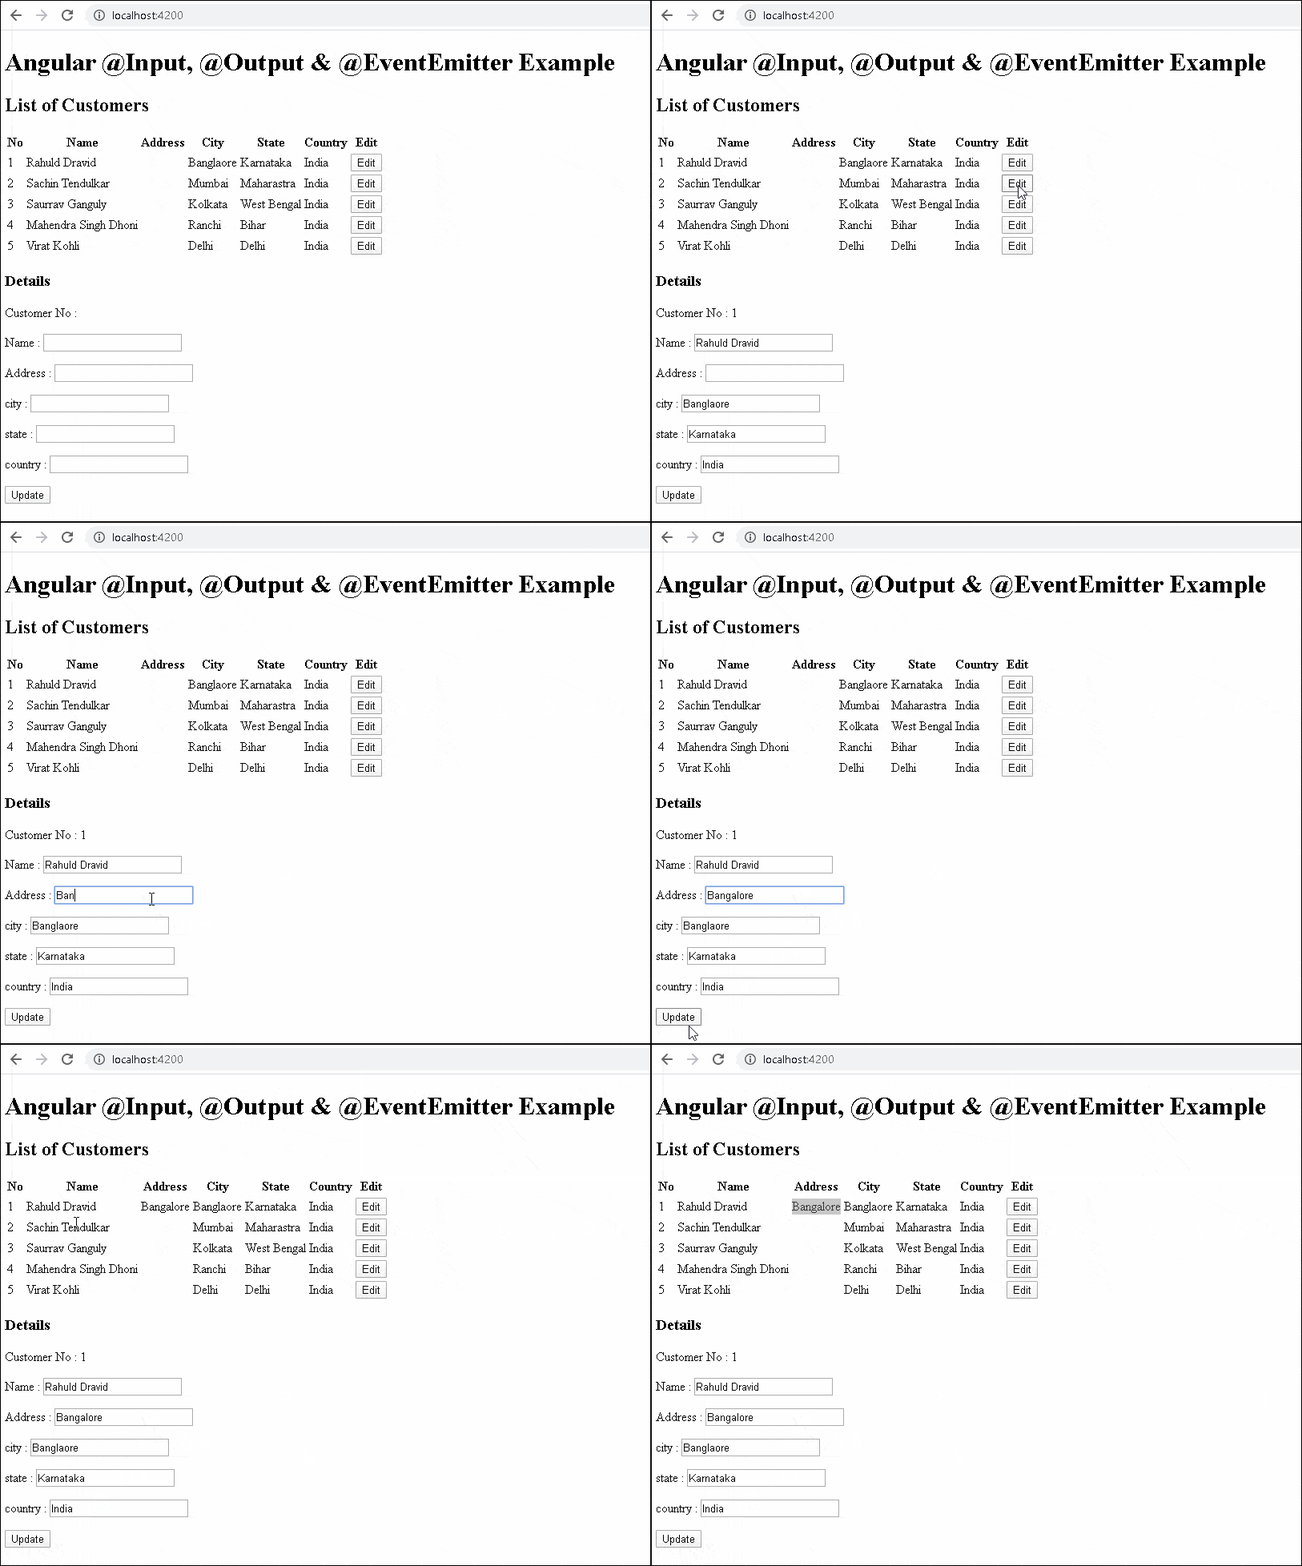
The app we build has two components. The parent component shows a list of customers. The user has the option to click on the edit button, which results in a child component displaying the customer form Once the user updates the records, the child component raises the event. The parent captures the event. The parent then updates the list with the new data.
Create a new application using the following command
1 2 3 4 5 6 | ng new InputOutputExample cd InputOutputExample |
Create the customerList & customerDetail components. Also, create the customer class
1 2 3 4 5 | ng g c customerList ng g c customerDetail ng g class customer |
Customer
1 2 3 4 5 6 7 8 9 10 11 12 | export class Customer { customerNo: number=0; name: string=""; address: string=""; city: string=""; state: string=""; country: string=""; } |
app.module.ts
The ngModel needs the FormsModule. Hence import it and add it in import metadata.
1 2 3 4 5 6 7 8 9 10 11 12 13 14 15 16 17 18 19 20 21 22 23 24 25 26 27 | import { BrowserModule } from '@angular/platform-browser'; import { NgModule } from '@angular/core'; import { FormsModule } from '@angular/forms' import { AppRoutingModule } from './app-routing.module'; import { AppComponent } from './app.component'; import { CustomerListComponent } from './customer-list/customer-list.component'; import { CustomerDetailComponent } from './customer-detail/customer-detail.component'; @NgModule({ declarations: [ AppComponent, CustomerListComponent, CustomerDetailComponent ], imports: [ BrowserModule, AppRoutingModule, FormsModule ], providers: [], bootstrap: [AppComponent], }) export class AppModule { } |
Child Component
The child component gets an instance of the customer in its input property customer. The parent needs to set it using the property binding
Users can edit the customer. Once finished they will click the update button. The update method raises the customerChange event. We pass the customer as the argument to the event. The parent component listens to the event and receives the data.
The following is the complete code of the CustomerDetailComponent.
1 2 3 4 5 6 7 8 9 10 11 12 13 14 15 16 17 18 19 20 21 22 23 24 25 | import { Component, OnInit, Input, Output,EventEmitter } from '@angular/core'; import { Customer } from '../customer'; @Component({ selector: 'app-customer-detail', templateUrl: './customer-detail.component.html', styleUrls: ['./customer-detail.component.css'] }) export class CustomerDetailComponent implements OnInit { @Input() customer:Customer = new Customer(); @Output() customerChange:EventEmitter<Customer> =new EventEmitter<Customer>(); constructor() { } ngOnInit() { } update() { this.customerChange.emit(this.customer); } } |
'app-customer-detail' is the name of the selector for this component.
The customer property is the input property decorated with Input.
1 2 3 | @Input() customer:Customer = new Customer(); |
customerChange is decorated as the output property of type EventEmitter
1 2 3 | @Output() customerChange:EventEmitter<Customer> =new EventEmitter<Customer>(); |
Whenever the user updates the customer, we raise the event customerChange. We pass the updated customer as the argument to it.
1 2 3 4 5 | update() { this.customerChange.emit(this.customer); } |
The customer-detail.component.htmlis as follows.
1 2 3 4 5 6 7 8 9 10 | <p>Customer No : {{customer.customerNo}}</p> <p>Name : <input [(ngModel)]="customer.name"></p> <p>Address : <input [(ngModel)]="customer.address"></p> <p>city : <input [(ngModel)]="customer.city"></p> <p>state : <input [(ngModel)]="customer.state"></p> <p>country : <input [(ngModel)]="customer.country"></p> <button (click)="update()">Update</button> |
The ngModel binds the customer to the input element. It is a two-way binding. The click event of the button is bound to update() method in the component.
Parent Component
The job of the parent component is to display a list of customers. When the user clicks on the edit button pass the selected customer to the child component. Then wait for the customerChange event. Update the customer’s list on receipt of data from the child.
The following is the customer-list.component.html
1 2 3 4 5 6 7 8 9 10 11 12 13 14 15 16 17 18 19 20 21 22 23 24 25 26 27 28 29 30 31 | <h2>List of Customers</h2> <table class='table'> <thead> <tr> <th>No</th> <th>Name</th> <th>Address</th> <th>City</th> <th>State</th> <th>Country</th> <th>Edit</th> </tr> </thead> <tbody> <tr *ngFor="let customer of customers;"> <td>{{customer.customerNo}}</td> <td>{{customer.name}}</td> <td>{{customer.address}}</td> <td>{{customer.city}}</td> <td>{{customer.state}}</td> <td>{{customer.country}}</td> <td><button (click)="showDetails(customer)">Edit</button></td> </tr> </tbody> </table> <h3>Details</h3> <app-customer-detail [customer]="selectedCustomer" (customerChange)="update($event)"></app-customer-detail> |
Use the ngFor directive to loop through the customer list and display the customer details.
1 2 3 | <tr *ngFor="let customer of customers;"> |
The event binding to capture the click event. We pass the customer object to the showDetails method
1 2 3 | <td><button (click)="showDetails(customer)">Edit</button></td> |
app-customer-detail is the selector for the CustomerDetailComponent. We use the property binding to send the selectedCustomer to the child component. The child component raises the customerChange event, which we listen to using the event binding and call the update method.
Customer-list.component.ts
The component code of the parent component. It has two method showDetails & update
1 2 3 4 5 6 7 8 9 10 11 12 13 14 15 16 17 18 19 20 21 22 23 24 25 26 27 28 29 30 31 32 33 34 35 36 37 38 39 40 41 42 | import { Component, OnInit } from '@angular/core'; import { Customer } from '../customer'; import { element } from 'protractor'; import { ObjectUnsubscribedError } from 'rxjs'; @Component({ selector: 'app-customer-list', templateUrl: './customer-list.component.html', styleUrls: ['./customer-list.component.css'] }) export class CustomerListComponent implements OnInit { customers: Customer[] = [ {customerNo: 1, name: 'Rahuld Dravid', address: '', city: 'Banglaore', state: 'Karnataka', country: 'India'}, {customerNo: 2, name: 'Sachin Tendulkar', address: '', city: 'Mumbai', state: 'Maharastra', country: 'India'}, {customerNo: 3, name: 'Saurrav Ganguly', address: '', city: 'Kolkata', state: 'West Bengal', country: 'India'}, {customerNo: 4, name: 'Mahendra Singh Dhoni', address: '', city: 'Ranchi', state: 'Bihar', country: 'India'}, {customerNo: 5, name: 'Virat Kohli', address: '', city: 'Delhi', state: 'Delhi', country: 'India'}, ] selectedCustomer:Customer = new Customer(); constructor() { } ngOnInit() { } showDetails(customer:Customer) { this.selectedCustomer=Object.assign({},customer) } update(customer:Customer) { console.log(customer) var cust=this.customers.find(e => e.customerNo==customer.customerNo) Object.assign(cust,customer) alert("Customer Saved") } } |
The showDetails method gets the customer as its argument. We clone it & assign it to selectedCustomer
Since the customer is an object it is Passed by Reference. When you make any modification to the customer it will also be reflected in the customer’s collection. We want the update the customer’s only when we get the data from the child. Hence we clone the customer and send it to the child component.
If you are passing primitive data types like numbers are Passed by Value.
Finally in the root component (i.e. app.component.html ) copy the following
1 2 3 | <app-customer-list></app-customer-list> |
Run the app

Notes on @Input & @Output
You can also pass the optional name
Input decorator allows us to pass an option name, which you can use it while binding in the parent
For Example
1 2 3 | @Input(‘customerData’) customer:Customer; |
Intercept input property changes with a setter
You can also create a setter property
1 2 3 4 5 6 7 8 9 10 | private _customerData = ''; @Input() set customer(customer: Customer) { //You can add some custom logic here this._customerData = customer; console.log(this._customerData) } get customer(): string { return this._customerData; } |
Subscribe to @Input changes using ngChanges
You can also subscribe to the changes using ngOnChanges life cycle hook.
EventEmitters are observable
EventEmitters are RxJs Subjects. Hence you can make use of RxJs operators to manipulate them. Read more about it from this link.
Pass by reference
The objects are passed by reference. Hence if you modify the object, you are updating the original object. The primitive data types like numbers are Passed by Value.
References
- https://angular.io/api/core/Input
- https://angular.io/api/core/Output
- https://angular.io/api/core/EventEmitter
- https://angular.io/guide/component-interaction
Summary
This article shows how to make use of Input, output & EventEmitter in Angular. We use them to communicate with parent & child components. The Child component defines the input & output property using @Input & @output decorators. The Parent sets the input property using property binding. The child component raises the event using EventEmitter whenever it wants to send data to the parent. The parent listens to output property using event binding.


Object.assign(cust,customer)
this line giving error, update not working
this may works Object.assign(cust!, customer) . used ! mark after the cust variable name.
This article is awesome !!!
why my model changed before press update button?
Few things missed here.
ng n c customerList use ng g c customerList.
Also add in app.component.html.
Ignore this error “ERROR TypeError: Cannot read property ‘customerNo’ of undefined”, once we start edit this will be cleared.
Thanks
add => app.list.component in app.component.html.
You can get rid of the “ERROR TypeError:….” by defining a blank value for selectedCustomer in customer-list.component.ts. For example:
ngOnInit() {
let myCustomer = {customerNo:0, name:””,address:””,city:””,state:””,country:””};
this.showDetails(myCustomer);
}
Sorry, should be
let myCustomer = {customerNo:0, … etc.
Sorry again, The reply editor won’t let me type angle brackets. So the let statement should be myCustomer = angleBracket Customer angleBracket{ customerNo:0, …etc.
Thanks, super tutorial!!
Thanks Updated the Article
this is a godsend! thank you for the detailed tutorial
This is so clearly written and I particularly appreciate the followup links at the end. Thanks, well done!!
Have anything on dynamic components?
yes