In this tutorial, let us learn how to build an ASP.NET core MVC app from the scratch using Visual Studio. In the last article, we learnt what is MVC Design Pattern is and how it works in ASP.NET MVC Core applications. We continue to explore the MVC architecture and show you how to add the MVC Middleware to the App. Then we will show you how to add Controller, View and a Model to the ASP.NET MVC Core App.
Table of Contents
Building Your First ASP.NET Core Web App
Open Visual Studio 2017 and create an ASP.NET Core Empty Project. Name the project as MVCCoreApp. You can refer to the tutorial Getting started with ASP.NET Core in Visual Studio.
MVC Middleware
The first thing you need to do is to add MVC Middleware.
A Middleware is a software component that hooks into the request pipeline to handle web requests and generate responses. We discussed this in the tutorial. Please head over there if you are new to Middleware and request pipeline.
Adding MVC Services
To make our project work with MVC, First, we need to add the MVC Related services. Open the ConfigureServices method and add the AddMvc() extension method.
The AddMvc method adds all the MVC Related Services like Authorization, RazorViewEngine, Tag Helpers, Data Annotations, JsonFormatters, Cors etc to the Services collection. Then these services can be injected wherever they are required using Dependency Injection.
The services are registered in the Startup class inside the method ConfigureServices.
Open the Startup.cs and update it as follows
1 2 3 4 5 6 | public void ConfigureServices(IServiceCollection services) { services.AddMvc(); } |
Adding MVC Middleware
Next, we need to add the MVC Middleware to the request pipeline. This is done by calling the app.UseMvcWithDefaultRoute(). The Middleware must be registered inside the Configure method of the Startup class.
UseMvcWithDefaultRoute is is an extension method found in the Microsoft.AspNetCore.Mvc.Core namespace. This Package is part of the Microsoft.AspNetCore.All meta package and already gets installed.
1 2 3 4 5 6 7 8 9 10 11 12 13 | public void Configure(IApplicationBuilder app, IHostingEnvironment env) { if (env.IsDevelopment()) { app.UseDeveloperExceptionPage(); } app.UseStaticFiles(); app.UseMvcWithDefaultRoute(); } |
The UseMvcWithDefaultRoute installs MVC Middleware with the default Route.
Another option is to register the MVC with the UseMVC method. UseMVC requires us to set up the routes. We will cover that in the tutorial on Routing.
Adding the Controllers
The Controllers in the MVC pattern are responsible for responding to the user input. They are responsible to build the model and pass it to the View.
Right Click on the solution folder and Create a Folder called Controllers.
Right-click on the Controller’s folder and select Add -> Controller.
We are then directed to “Add Dependencies to enable scaffolding” dialogue box.
This dialogue box appears, when you are adding the controller for the first time. You are presented with two options
Minimal DependenciesFull Dependencies

Full Dependencies configures and add the layout, error pages, script libraries and bundling to the package.
The Minimal dependencies add the Microsoft.VisualStudio.Web.CodeGeneration.Design to the package. This assembly contains the tooling required to run the scaffolding engine.
Select Minimal Dependencies and click ok.
Wait for NuGet Package manager to restore the package.
Now, add the controller again. Choose MVC Controller – Empty.
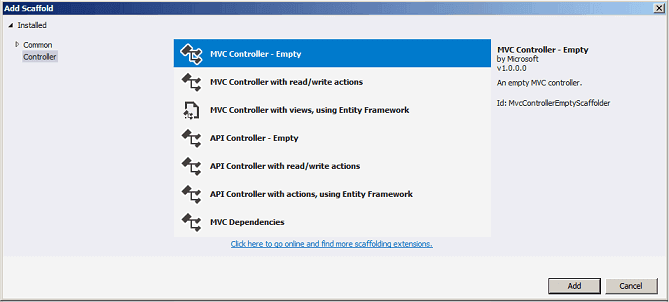
Enter the name as HomeController and click ok.
Now Open the HomeController.
1 2 3 4 5 6 7 8 9 10 11 12 13 14 15 16 17 18 19 20 | using System; using System.Collections.Generic; using System.Linq; using System.Threading.Tasks; using Microsoft.AspNetCore.Mvc; namespace MVCCoreApp.Controllers { public class HomeController : Controller { public IActionResult Index() { return View(); } } } |
The HomeController inherits from the Controller and has one public method Index. The Public methods in the Controller class are called Action Methods.
Now, change the index method to return the string as shown below
1 2 3 4 5 6 | public string Index() { return "hello from the Index method of the HomeController"; } |
Run the app and you should be able to see “hello from the Index method of the HomeController” in the browser.
Append the URL with /Home or /Home/Index also returns the same result.
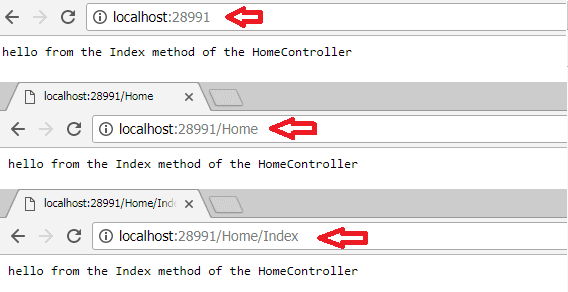
When you type /Home/Index in the browser window, the MVC looks for the Controller by the name HomeController and then looks for the Index Action method. It then invokes the Index method and returns the result back to the user.
Now, you append the URL with /Home/Test. This will result in a 404 result sent to the browser. This is because there is no Test Method in the HomeController.
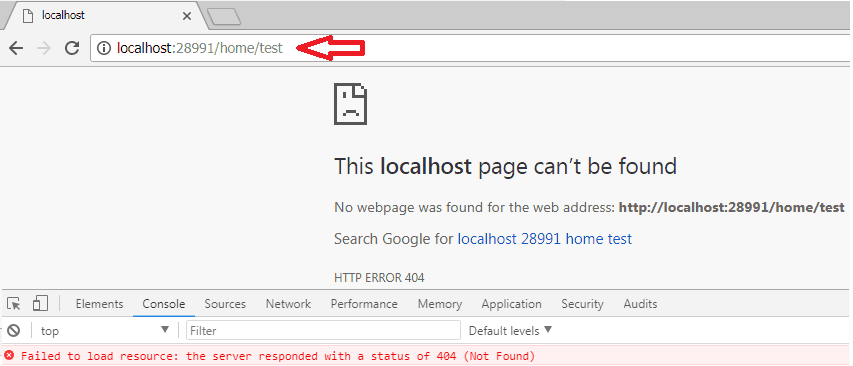
The URL / or /Home also works because MVC Configured to serve /Home/Index when nothing is specified in the URL.
The ASP.NET Core MVC module uses the routing table to decide, which controller Action method to Invoke. You can learn about it from routing in ASP.NET Core
Adding the View
The view is a visual representation of the model. It is the responsibility of the Controller to pass the model to the View. It is the responsibility of the View is to render the model given to it and present it to the user.
Now, let us add the View to our project.
Update the Controller to Serve the View
Goto to HomeController and select the Index method. Change the Index method to the following
1 2 3 4 5 6 | public IActionResult Index() { return View(); } |
We have modified the Index method to return IActionResult instead of the string. An ActionResult is a return type of a controller method (or Action method)
The View() method returns the View associated with the Index method.
Add the View
Now, Right Click and click on Add View.
This brings up the Add View dialogue box
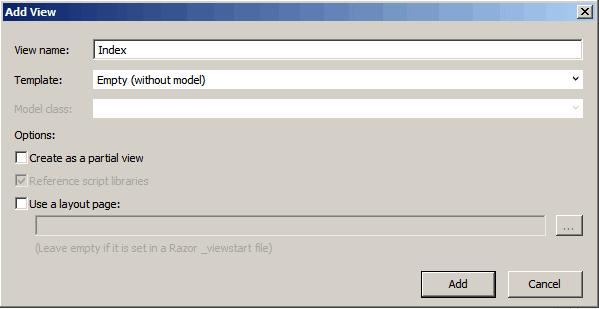
Keep the View name as Index. Template Empty (without model). Remove the selection from Create as Partial Views and Use a Layout Page as shown below.
Click on Add to create the View.
This Creates the View Under the Views/Home folder. This is the convention followed by the ASP.NET MVC core.
Views Folder
By Convention, All views are stored in the Views folder in the root of the app.
Each Controller gets a folder in the Views folder with the name same as the Controller but without the Controller Suffix. Thus, for the HomeController, there is a folder with the name Home in the Views folder.
Each Action method in the Controller gets a file of its own, named same as the Action method. Thus for the index method of the HomeController, there’s a file with the name index.cshtml in the Views/Home folder
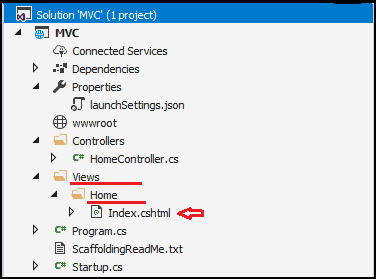
Now, open the view.cshtml and add the “<p>Hello from the View</p>” after the title tag as shown below
1 2 3 4 5 6 7 8 9 10 11 12 13 14 15 16 | @{ Layout = null; } <!DOCTYPE html> <html> <head> <meta name="viewport" content="width=device-width" /> <title>Index</title> <p>Hello from the View</p> </head> <body> </body> </html> |
Now, run the app and you should see the following

The MVC Controller Action method invokes the View by using the method View(). The MVC then looks for the View in the Views/<Controller>/ folder and chooses the <ActionMethod>.cshtml as the view.
Adding the Model
Finally, let us add the Model to the app.
The Model represents the data that needs to be shown to the user and some associated logic. It is an object or just another c# class with properties and methods.
Create Models folder in the root of the application. Now, add a class with the name HomeModel.cs
1 2 3 4 5 6 7 8 9 | namespace MVCCoreApp.Models { public class HomeModel { public string Message = "Hello from Model"; } } |
Update the Controller to inject model to the View
Goto the HomeController and
1 2 3 4 5 6 7 | public IActionResult Index() { HomeModel message = new HomeModel(); return View(message); } |
We are creating the message variable and instance of the HomeModel
1 2 3 | HomeModel message = new HomeModel(); |
and invoking the view with the
1 2 3 | return View(message) |
Update the View to Receive the model
1 2 3 4 5 6 7 8 9 10 11 12 13 14 15 16 17 18 19 20 21 | @model MVCCoreApp.Models.HomeModel; @{ Layout = null; } <!DOCTYPE html> <html> <head> <meta name="viewport" content="width=device-width" /> <title>Index</title> <p> @Model.Message</p> </head> <body> </body> </html> |
Now run the app and you will see the Hello from Model.

Source Code
The Complete Source code for this tutorial is available on GitHub
Summary
In this tutorial, we built an ASP.NET Core app from the scratch using Visual Studio. We learnt how to add MVC Middleware. Then, We added a Controller which returned a Hello Message. We then added View and Model to Complete the Application.



dggtrs
Good tutorials for new beginners