In this tutorial, we will build a very basic data entry form using the ASP.NET Core. A form is an HTML form that lets visitors to enter the information in the web page. We will build a simple form, which will accept the product details. Then we will see how to receive the form data on our server when the user hits the submit button.
If you are new to ASP.NET core you can refer to these tutorials on how to create ASP.NET Core applications.
- Installing and setup ASP.NET Core development Environment
- Getting Started with ASP.NET Core MVC
- Building First ASP.NET Core Application
Table of Contents
Create a new Project
Create a new Project ASPNetCoreForms.
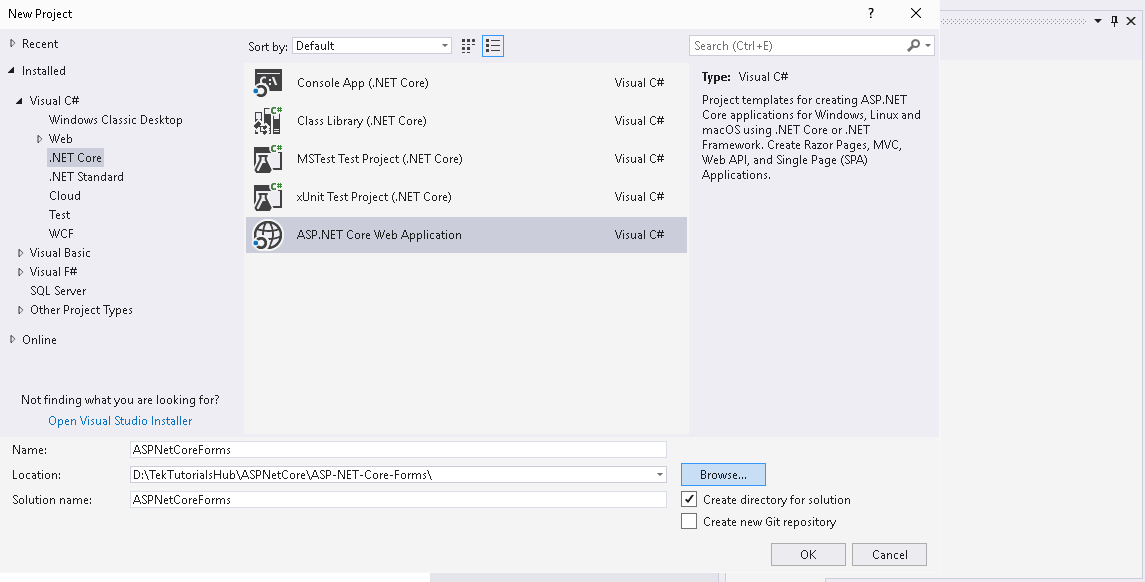
Choose the ASP.NET Core Web Application template. This Template is available under Visual C# -> .NET Core option. Name the project as ASPNetCoreForms.
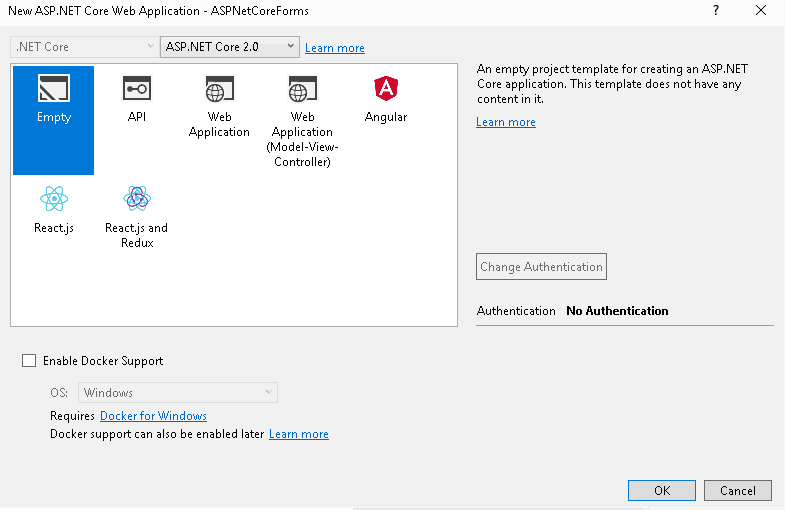
In the next screen select .Net Core and ASP.NET Core 2.0 and select an Empty template and Click ok to create the Project.
Build and the project. You should be able to see “Hello World” displayed on the browser.
Setup MVC Middleware
Open the startup.cs and setup MVC related services as shown below. For the detailed explanation please refer to the Building the first ASP.NET Core Application tutorial
1 2 3 4 5 6 7 8 9 10 11 12 13 14 15 16 | public void ConfigureServices(IServiceCollection services) { services.AddMvc(); } public void Configure(IApplicationBuilder app, IHostingEnvironment env) { if (env.IsDevelopment()) { app.UseDeveloperExceptionPage(); } app.UseMvcWithDefaultRoute(); } |
Create a View Model
Right click on Solution folder and create a Models folder
Under Models folder create a class Product.cs and add the following code
1 2 3 4 5 6 7 8 9 10 11 12 13 | namespace ASPNetCoreForms.Models { public class ProductEditModel { public int ID { get; set; } public string Name { get; set; } public decimal Rate { get; set; } public int Rating { get; set; } } } |
Note that we are naming it as the ProductEditModel as this class is going to be used in the data entry form.
You can read about the difference between various types of models from the article Models and ViewModels
Create a Controller
The next step is to create the Controller.
Create the Controllers folder in the root of the application.
Select and right-click Controllers folder and select Add -> Controller.
Select MVC Controller – Empty and click on Add
Name the Controller as HomeController
This will create the controller with index action method. Right click on Index action method and click on add view to create the index view.
Create Action Method
Now Open the HomeController.cs
First, Import the ProductEditModel.
1 2 3 | using ASPNetCoreForms.models; |
Then, add the create Action method
1 2 3 4 5 6 7 8 9 10 11 12 13 14 15 16 17 18 19 20 21 22 23 24 | [HttpGet] public IActionResult Create() { return View(); } [HttpPost] public IActionResult Create(ProductEditModel model) { string message = ""; if (ModelState.IsValid) { message = "product " + model.Name + " Rate " + model.Rate.ToString() + " With Rating " + model.Rating.ToString() + " created successfully"; } else { message = "Failed to create the product. Please try again"; } return Content(message); } |
We have defined two action methods with the name create. These action methods are decorated with HttpGet and HttpPost Action verbs.
By using the Action verbs we are ensuring that the, first create method handles only the HTTP Get request and the second handles only the HTTP Post request.
The create method accepts the ProductEditModel as input.
1 2 3 | public IActionResult Create(ProductEditModel model) |
The ProductEditModel is populated by the values submitted in the form. This automatically happens behind the scene by a Process called Model Binding.
The Model binding in ASP.NET Core MVC maps data from HTTP requests to action method parameters. The parameters may be simple types such as strings, integers, or floats, or they may be complex types.
Next, we are using ModelState.IsValid method to check if the ProductEditModel, which is received from the user is valid
1 2 3 | if (ModelState.IsValid) |
The ASP.NET Core Validation engine checks the data submitted in the form for any validation errors. It uses the data annotations defined on the ProductEditModel to validate the data submitted in the form. This Validation occurs before the invocation of the action method.
The Validation Engine Updates the ModelState object. If there are no errors, the isValid property is updated to true. If the errors found, the errors are added to the ModelState and isValid is made false.
Finally, we return success or failure message to the client using the contentResult.
1 2 3 | return Content(message); |
Create the View
Select the create method and right click and click on Add View.
Select the template Empty (without model).
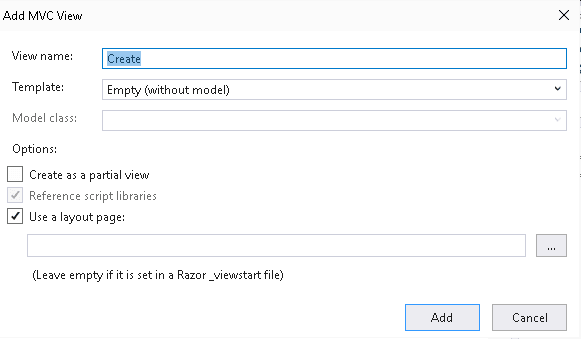
This will create the view with the name create.cshtml in the views folder
Create a Simple Form
Open the Create.cshtml and add the following code.
1 2 3 4 5 6 7 8 9 10 11 12 13 14 15 16 17 18 | @{ ViewData["Title"] = "Create"; } <h2>Create</h2> <form action="/home/create" method="post"> <label for="Name">Name</label> <input type="text" name="Name" /> <label for="Rate">Rate</label> <input type="text" name="Rate" /> <label for="Rating">Rating</label> <input type="text" name="Rating" /> <input type="submit" name="submit" /> </form> |
This is a simple HTML Form.
Form Action
First, we have defined an HTML form tag, which is used to build the HTML Forms. The Action attribute value calls the “/home/create” with the HTTP Post request when the user clicks on the submit button.
1 2 3 | <form action="/home/create" method="post"> |
Next, we have series of input text fields, which accepts the values for Name, Rate & Rating of the ProductEditModel
1 2 3 4 5 6 | <label for="Name">Name</label> <input type="text" name="Name" /> <label for="Rating">Rating</label> <input type="text" name="Rating" /> |
The important point is here the name property of the input field must match the properties of the ProductEditModel. The Model binding uses the name fields to populate the ProductEditModel when the form is submitted to the server.
The last line consists of a submit button.
1 2 3 | <input type="submit" name="submit" /> |
Now, Open the index.cshtml
1 2 3 4 5 6 7 8 9 | @{ ViewData["Title"] = "Index"; } <h2>Index</h2> <a href="Home/Create">Create</a> |
We just added the link to Create Action method
1 2 3 | <a href="Home/Create">Create</a> |
Index View
Now, Open the HomeController.cs file
Select the index action method and right click and click on Add View to create the Index View.
Copy the following code
1 2 3 4 5 6 7 | @{ ViewData["Title"] = "Index"; } <h2>ASP.NET Core MVC - Forms</h2> <a href="Home/Create">Create</a> |
Finally, run the application.
Click on Create button, which will open the create form. Enter the values as shown below and click submit.
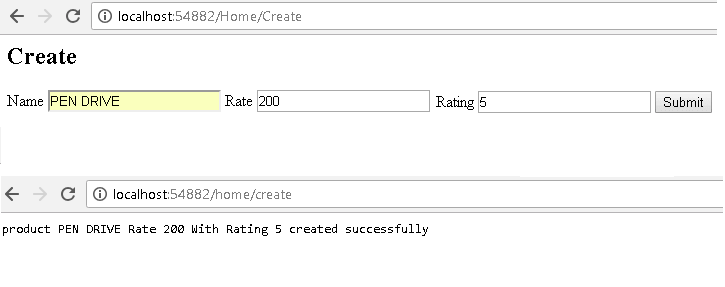
The form values are submitted via HTTP Post to the /Home/Create action method.
The ASP.NET Core model binder creates a new instance of the ProductEditModel. It will then maps each value of the input fields to the properties of ProductEditModel.
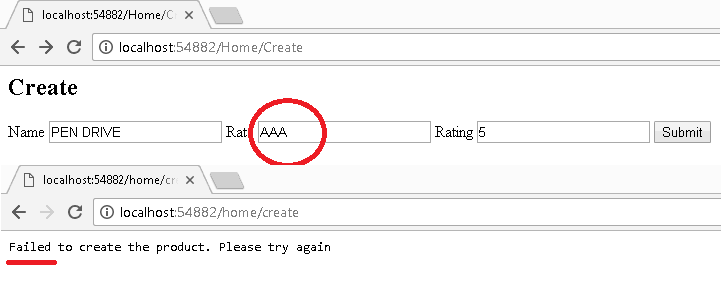
Now, make an invalid entry as shown below. The model binder fails to map the form values to the instance of ProductEditModel and ModelState.IsValid returns false.
Summary
This was a pretty basic form, which we have built using the ASP.NET Core. This demonstrates some of the important concepts on how to build the ASP.NET core HTML Forms, Model Binding etc.
In the next few tutorials, we will show you how to refine the UI by adding a Strongly Typed Views. Next, we will show you how to use Tag Helpers to add the server side code to the view. Next, we will look at the built-in tag helpers like Input Tag Helper, Label Tag Helper, Form Tag Helper etc. Then we will learn how to pass data from view to controller using the Model binding.


Followed the tutorial dosen’t work for me
Series is Absolutely brilliant. Gobsmackingly so. Reducing things to their simplest possible terms shows a real understanding.
Very tiny grammatical errors throw you off a bit eg
“If the errors found, the errors are added to the ModelState and isValid is made false.” Otherwise – perfection 🙂
Very grateful.
Super simple, just what I was looking for!