In the previous tutorial, we saw how to build a simple HTML form. We made use of the ViewModel but did not pass the instance of it to the view. The ViewModel can be passed from the controller to the view either using Viewbag or Viewdata. The ASP.NET Core provides the ability to pass strongly typed models or objects to a view. This approach helps us with the intellisense and better compile-time checking of our code. The scaffolding mechanism in Visual Studio can be used to create the View. Let us learn all these in the article.
Table of Contents
What is Strongly Typed View
The view which binds to a specific type of ViewModel is called as Strongly Typed View. By specifying the model, the Visual studio provides the intellisense and compile time checking of type.
We learnt how to pass data from Controller to View in this tutorial. This is usually done using the ViewBag or ViewData. The Compiler does not know anything about the type of model.
In the strongly typed View, we let the View know the type of ViewModel being passed to it. using the @model directive
@model directive
The strongly typed Views are created using the @model directive
The Viewdata ViewDataDictionary has a special property called model, which is a c# dynamic object.
This allows us to use the viewdata.model.Prop. Using the Model this way does not give any intellisense help as the properties of the model are determined at the runtime. The compile-time type checking is also unavailable.
The Above problems are solved, by letting the View know beforehand the type of model that is going to be bound to Viewdata.model property. This is done using The @model directive, which is placed at the top of the view file specifying the type of the ViewModel that is being passed.
When you use @model directive, the razor engine assigns that type to the Viewdata.Model property The Model property then returns the type declared.
For example, the directive
1 2 3 | @model ProductEditModel |
is translated into
1 2 3 | ProductEditModel Model; |
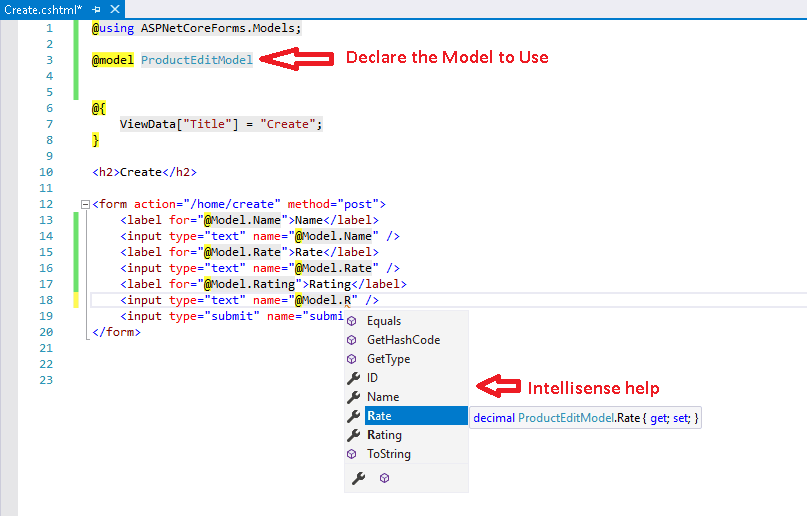
Since the type of the Model is now known at the compile time, we get the advantage of IntelliSense and compile time error checking.
Example of Strongly typed View
We will continue from where we left off in the last tutorial and update the code to add the ProductEditModel as the strongly typed view.
Now Open the create.cshtml and add the following code at the top.
1 2 3 | @model ProductEditModel |
And then you can refer to the model in the View directly
1 2 3 4 5 6 7 8 9 10 11 | <form action="/home/create" method="post"> <label for="@Model.Name">Name</label> <input type="text" name="@Model.Name" /> <label for="@Model.Rate">Rate</label> <input type="text" name="@Model.Rate" /> <label for="@Model.Rating">Rating</label> <input type="text" name="@Model.Rating" /> <input type="submit" name="submit" /> </form> |
Passing the Model from Controller to View
The Next step is to pass the instance of the ProductEditModel to the View
Open the HomeController.cs and go to Create action
1 2 3 4 5 6 7 8 | [HttpGet] public IActionResult Create() { ProductEditModel model = new ProductEditModel(); return View(model); } |
Now, run the application
Advantages of Strongly Typed View
- IntelliSense Help
- Compile time error checking
- You do not have to cast between types
Since there is only one Model Property, you can have only one ViewModel per View.
Model vs model
It is easy to mix up with the Model and model.
The model is directive that is used to declare the type of the ViewModel.
The Model is a variable used to access the ViewModel. The type of Model is declared by the keyword @model.
Using Scaffolding to generate the Strongly Typed View
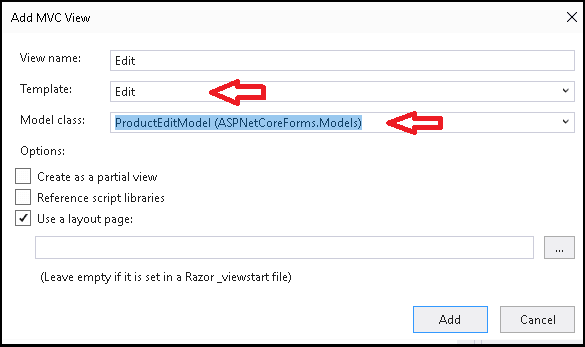
Visual studio Scaffolding system allows us to quickly create the view.
Open the HomeController.cs and create the Edit method.
1 2 3 4 5 6 7 8 | [HttpGet] public IActionResult Edit() { ProductEditModel model = new ProductEditModel(); return View(model); } |
Select the Template as Edit
Select the Model Class as ProductEditModel
Click on Add to generate the View. Open the View
1 2 3 4 5 6 7 8 9 10 11 12 13 14 15 16 17 18 19 20 21 22 23 24 25 26 27 28 29 30 31 32 33 34 35 36 37 38 39 40 41 42 43 44 | @model ASPNetCoreForms.Models.ProductEditModel @{ ViewData["Title"] = "Create"; } <h2>Create</h2> <h4>ProductEditModel</h4> <hr /> <div class="row"> <div class="col-md-4"> <form asp-action="Create" method="post"> <div asp-validation-summary="ModelOnly" class="text-danger"></div> <div class="form-group"> <label asp-for="ID" class="control-label"></label> <input asp-for="ID" class="form-control" /> <span asp-validation-for="ID" class="text-danger"></span> </div> <div class="form-group"> <label asp-for="Name" class="control-label"></label> <input asp-for="Name" class="form-control" /> <span asp-validation-for="Name" class="text-danger"></span> </div> <div class="form-group"> <label asp-for="Rate" class="control-label"></label> <input asp-for="Rate" class="form-control" /> <span asp-validation-for="Rate" class="text-danger"></span> </div> <div class="form-group"> <label asp-for="Rating" class="control-label"></label> <input asp-for="Rating" class="form-control" /> <span asp-validation-for="Rating" class="text-danger"></span> </div> <div class="form-group"> <input type="submit" value="Create" class="btn btn-default" /> </div> </form> </div> </div> <div><a asp-action="Index">Back to List</a></div> |
Summary
We bound our view to the ViewModel to create the strongly typed view to the view. We also learned how to use the Scaffolding to generate the Strongly Typed View.


Great article. Thanks.
@model ProductEditModel
is translated into
ProductEditModel Model;
and not into
Customer Model;
Thanks
Updated the code