In the last tutorials we showed you how to create a controller and in the second tutorial, we showed how to add a view to our project. In the Third tutorial, we showed you how to add the model. Here is the link to those tutorials
- Create ASP.NET MVC Application
- Create ASP.NET MVC Application – Add View
- Create ASP.NET MVC Application – Add Models
We continue the project and add Create/Edit/Delete Functionality to the Project.
Table of Contents
CRUD Operation in ASP.NET MVC Application

Open the Project
Open the MVCHelloWorld Project we created in the last tutorial. We are not going to use the database for our example. So we need to store the data in some place. To do this let us use TempData object
What is TempData
TempData help us to keep the data between request. It is derived from TempDataDictionary class and stores the data in session variables. Unlike session variable, the data stored in Tempdata removed immediately, after it’s used in the next HTTP request.
List method
Open the list method and change it to hold the customer collection in TempData
1 2 3 4 5 6 7 8 9 10 11 12 13 14 15 16 17 18 19 20 21 22 23 24 25 26 | public ActionResult List() { OurDatabase DB = new OurDatabase(); List<Customer> Customers; if (TempData["Datastore"] == null) { //Get the list of Customers from the DB Customers = DB.Customers; //And Store it in TempData TempData["Datastore"] = Customers; } else { //Get already stored data from TempData Customers = (List<Customer>) TempData["Datastore"]; //Ask TempData to keep the data till the next request TempData.Keep(); } return View(Customers); } |
In the Code above, we check, whether we have Customers object to Tempdata. If exists, we are going to use it. If not we get it from our OurDatabase object
Note that we called TempData.keep(). This is because TempData will remove the data once the request is complete. We have to exclusively tell the Tempdata to keep the data and not to destroy it. This will keep the data until the next request.
Add Create Action Method
Open the Customer Controller. Add new Action Method Create as follows.
1 2 3 4 5 6 7 8 9 10 11 12 13 14 15 | public ActionResult Create() { //Ask TempData to keep the data until the next request. Otherwise, Tempdata will discard it. TempData.Keep(); //Empty Customer Object Customer model = new Customer(); //Pass it to the View return View(model); } |
Here we create a new customer object and pass it to the View.
Create a View for the Create method
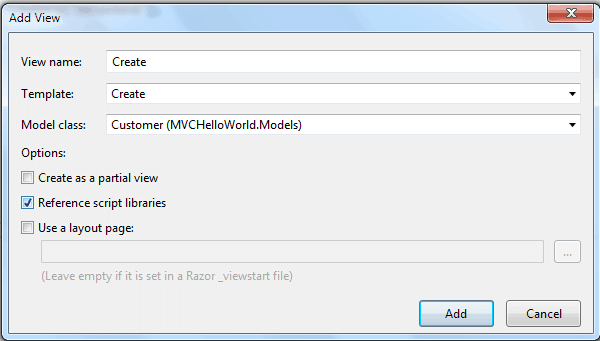
Click anywhere in the Create Action method and right click on Add View. This will bring up the Add View dialog box.

- Select View name as Create
- Under the Template drop-down, select Create
- Under model drop down, select Customer (MvcHelloWorld.Models)
- Click on Add
This will generate the Create view in folder Views ->Customer->Create.cshtml
Open the View
Browse to the view folder and open the Create.cshtml. You will see the following code.
1 2 3 4 5 6 7 8 9 10 11 12 13 14 15 16 17 18 19 20 21 22 23 24 25 26 27 28 29 30 31 32 33 34 35 36 37 38 39 40 41 42 43 44 45 46 47 48 49 50 51 52 53 54 55 56 57 58 59 60 61 62 63 64 65 66 67 68 69 70 71 72 73 74 75 76 77 78 79 80 81 82 83 84 85 86 87 88 89 90 91 92 93 94 95 96 97 98 99 | @model MVCHelloWorld.Models.Customer @{ Layout = null; } <!DOCTYPE html> <html> <head> <meta name="viewport" content="width=device-width" /> <title>Create</title> </head> <body> <script src="~/Scripts/jquery-1.10.2.min.js"></script> <script src="~/Scripts/jquery.validate.min.js"></script> <script src="~/Scripts/jquery.validate.unobtrusive.min.js"></script> @using (Html.BeginForm()) { @Html.AntiForgeryToken() <div class="form-horizontal"> <h4>Customer</h4> <hr /> @Html.ValidationSummary(true, "", new { @class = "text-danger" }) <div class="form-group"> @Html.LabelFor(model => model.CustomerName, htmlAttributes: new { @class = "control-label col-md-2" }) <div class="col-md-10"> @Html.EditorFor(model => model.CustomerName, new { htmlAttributes = new { @class = "form-control" } }) @Html.ValidationMessageFor(model => model.CustomerName, "", new { @class = "text-danger" }) </div> </div> <div class="form-group"> @Html.LabelFor(model => model.Address, htmlAttributes: new { @class = "control-label col-md-2" }) <div class="col-md-10"> @Html.EditorFor(model => model.Address, new { htmlAttributes = new { @class = "form-control" } }) @Html.ValidationMessageFor(model => model.Address, "", new { @class = "text-danger" }) </div> </div> <div class="form-group"> @Html.LabelFor(model => model.Country, htmlAttributes: new { @class = "control-label col-md-2" }) <div class="col-md-10"> @Html.EditorFor(model => model.Country, new { htmlAttributes = new { @class = "form-control" } }) @Html.ValidationMessageFor(model => model.Country, "", new { @class = "text-danger" }) </div> </div> <div class="form-group"> <div class="col-md-offset-2 col-md-10"> <input type="submit" value="Create" class="btn btn-default" /> </div> </div> </div> } <div> @Html.ActionLink("Back to List", "List") </div> </body> </html> |
Let us look at each line closely
1 2 3 | @using (Html.BeginForm()) |
A Html help function adds <form> tag to the generate Html. In this code @Html.BeginForm, is used without parameters, sends an HTTP POST Request to the current URL. In this case, this will insert
<form action=”/Customer/Create” method=”post”>
1 2 3 | @Html.AntiForgeryToken() |
This will prevent Cross-Site Request Forgery
1 2 3 | @Html.ValidationSummary(true, "", new { @class = "text-danger" }) |
Displays the validation Error message here
1 2 3 | @Html.LabelFor(model => model.CustomerName, htmlAttributes: new { @class = "control-label col-md-2" }) |
Create a label for the Customer Name field
1 2 3 4 | @Html.EditorFor(model => model.CustomerName, new { htmlAttributes = new { @class = "form-control" } }) @Html.ValidationMessageFor(model => model.CustomerName, "", new { @class = "text-danger" }) |
@Html.EditorFor renders the Editor for the Customer Name. In this Case, it will render the text box. @Html.ValidationMessageFor displays the validation message for the customername field right next to the editor
1 2 3 | <input type="submit" value="Create" class="btn btn-default" /> |
This is a simple submit button.
1 2 3 | @Html.ActionLink("Back to List", "List ") |
Creates a link to Controller Action List
Add Create Method for Post Method
Let us now create an action method to add the Customer to our Customer collection. Add the following code to the Customer Controller.
1 2 3 4 5 6 7 8 9 10 11 12 13 14 15 16 17 18 19 20 21 22 23 24 25 26 27 28 29 30 | [HttpPost] public ActionResult Create(Customer m) { //parameter m is filled from the view using ModelBinder List<Customer> Customers; if (ModelState.IsValid) { //Get the Customres collection from TempData Customers = (List<Customer>) TempData["Datastore"]; //Add the model received from the View to the collection Customers.Add(m); //Ask TempData to keep the data till the next request TempData.Keep(); //Go to List Action Method return RedirectToAction("List"); } //Error Condition. Ask TempData to keep the data till the next request TempData.Keep(); //Back to Create. Rectify errors and re Post return View(m); } |
1 2 3 | [HttpPost] |
[HttpPost] is attribute is attached to the Create Action Method. We have two Create Action Methods in our class. When the request comes from an HTTP POST Request method MVC Routing module picks up the right action method to execute using this attribute
1 2 3 | public ActionResult Create(Customer m) |
This action method is called when you click on submit button in our browser. This method takes customer as its parameter.
How does the Controller gets its data from the Create View?
Whenever the user submits the page using HTTP POST Request method the forms data fields are inserted in the message body. This data is can be accessed from the formsCollection. The fields in the formsCollection are automatically mapped to the Customer object by the Model Binder.
1 2 3 | if (ModelState.IsValid) |
ModelState.IsValid checks for any model errors, which have been added to ModelState.
The model binder dose some built in validation and checks and populates ModelState with the list of errors, if any. It usually checks for type conversion etc.
1 2 3 4 5 6 | Customers = (List<Customer>) TempData["Datastore"]; Customers.Add(m); TempData.Keep(); return RedirectToAction("List"); |
This is very simple. Customers collection is retrieved from TempData. The new customer is added to the collection. TempData.Keep() as discussed above keeps the data till the next request. Then the view is redirected to List Action Method
Test The Create Method
Run the project and change the URL to Customer/List
Click on Create and add a record and save it. You will see the new record is added to the customer collection and displayed in the grid.
Adding Edit, Delete and details Action Method
These methods are similar to Create method. Add the following code to the CustomerController.
1 2 3 4 5 6 7 8 9 10 11 12 13 14 15 16 17 18 19 20 21 22 23 24 25 26 27 28 29 30 31 32 33 34 35 36 37 38 39 40 41 42 43 44 45 46 47 48 49 50 51 52 53 54 55 56 57 58 59 60 61 62 63 64 65 66 67 68 69 70 71 72 73 74 75 76 77 78 79 80 81 82 83 84 85 86 87 88 89 90 91 92 93 94 95 96 97 98 99 100 101 102 | public ActionResult Edit(int id) { List<Customer> Customers; Customers = (List<Customer>)TempData["Datastore"]; Customer model = Customers.FirstOrDefault(x => x.id == id); TempData.Keep(); return View(model); } [HttpPost] public ActionResult Edit(Customer m) { //parameter m is filled from the view using ModelBinder List<Customer> Customers; if (ModelState.IsValid) { // Get the list of Customers from the datastore Customers = (List<Customer>)TempData["Datastore"]; //Get the model being edited from the customer collection Customer model = Customers.FirstOrDefault(x => x.id == m.id); //Update the model model.id=m.id; model.Country = m.Country; model.Address = m.Address; //Tempdata to keep the data till the next request TempData.Keep(); return RedirectToAction("List"); } TempData.Keep(); return View(m); } public ActionResult Details(int id) { //id of the Customer to Edit List<Customer> Customers; //Get Customer Collection Customers = (List<Customer>)TempData["Datastore"]; //Get the customer with the selected id from the customers collection Customer model = Customers.FirstOrDefault(x => x.id == id); TempData.Keep(); //Send it to the view return View(model); } public ActionResult Delete(int id) { List<Customer> Customers; //Get Customer Collection Customers = (List<Customer>)TempData["Datastore"]; //Get the customer with the selected id from the customers collection Customer model = Customers.FirstOrDefault(x => x.id == id); TempData.Keep(); //Send it to the view return View(model); } [HttpPost] public ActionResult Delete(Customer m) { List<Customer> Customers; if (ModelState.IsValid) { // Get the list of Customers from the datastore Customers = (List<Customer>)TempData["Datastore"]; //Get the model being edited from the customer collection Customer model = Customers.FirstOrDefault(x => x.id == m.id); //Remove the customer from the collection Customers.Remove(model); //Tempdata to keep the data till the next request TempData.Keep(); return RedirectToAction("List"); } TempData.Keep(); return View(m); } |
Creating Edit, Delete and Details Views
Click anywhere in the Corresponding Action method for which view is to be generated and right click on Add View. This will bring up the Add View dialogue box.
- Select View name same as Action Method
- Under the Template drop-down, select either Edit, Delete or Details
- Under model drop down, select Customer (MvcHelloWorld.Models)
- Click on Add
This will generate the Corresponding view in folder Views ->Customer
Open each view and go to the bottom and change @Html.ActionLink(“Back to List”, “Index”) to @Html.ActionLink(“Back to List”, “List”)
Run the Project
Run the Project and Type Customer/List in the URL. Test Edit, Delete and details Actions.
CONCLUSION
This ends our four-part tutorial on How to Create MVC Application. We have learnt how to Create a Simple Project and added Controller, View and model. We also looked at how to Add Create, Edit, Delete actions.


