In this tutorial, we will show how to use Code First with the existing database in entity framework.
In our last tutorials, we explained how to define your model using POCO classes. You can fine-tune your models using the Code First Conventions, Data Annotations attribute, and Fluent API.
What if you are asked to implement Entity Framework Code First on existing database ?. In such scenario, you have two options. One option is to write all your POCO classes by hand. The second option is to Reverse Engineer the existing database using some external tools.
Table of Contents
Reverse Engineer Code First with Existing Database
The Entity Framework Version 6.1 and later provides us with an easy option to Reverse Engineer the existing Database. In this step by step walkthrough, we will show you how to reverse engineer an existing database
Existing Database
First, we need an existing database. You can choose any database. Let us use the AdventureWorks database. You can download it from the link http://msftdbprodsamples.codeplex.com/releases/view/59211.
Once downloaded, Restore the database to SQL Server
Entity Framework 6 Tools for Visual Studio 2012 & 2013
Download and install the Entity Framework 6 Tools from the link Provided. This tool has the option to Reverse Engineer Code First.
Create the Project
Open the Visual Studio 2013 or 2012 and perform the following tasks
- Select File -> New -> Project
- Choose C#
- Select Console Application
- Name the Application as EFCodeFirstExistingDatabase
- Click on OK
Install Entity Framework
Go to Tools -> Library Package Manager -> Package Manager Console
Run the following command in the Package Manager Console
1 2 3 | Install-package entityframework |
ADO.NET Entity Model Wizard
- Right Click on Project.
- Click on Add -> New Folder.
- Name the folder as Models.
All our models will go into this folder - Now right click on the Models.
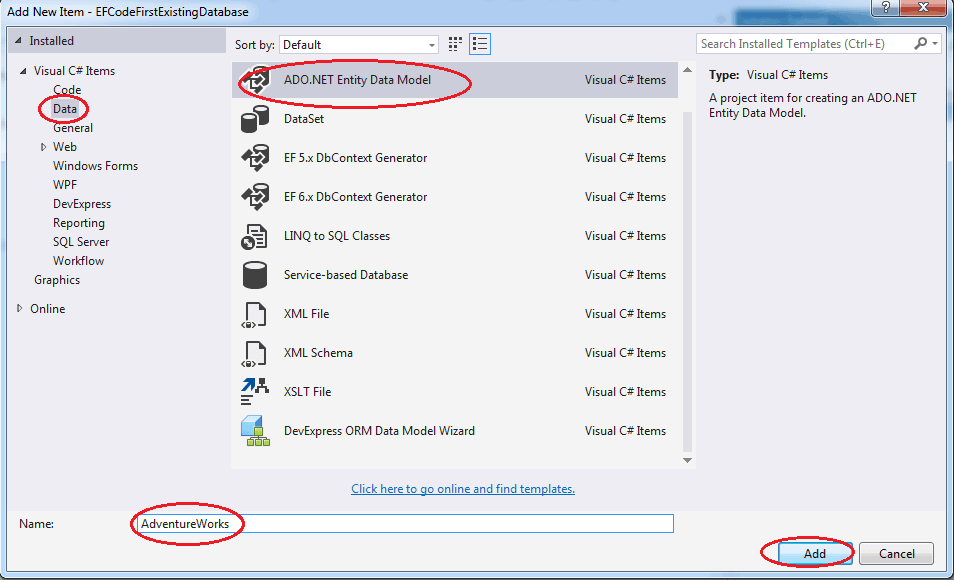
- Click on Add -> New Item
- Under data choose ADO.NET Entity Model
- Name it as AdventureWorks
- Click on Add
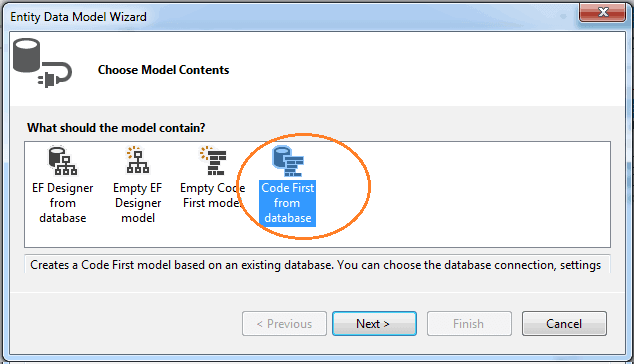
You will be taken to the Entity Data Model Wizard dialogue box. Choose Code First from Database Option. Click on Next
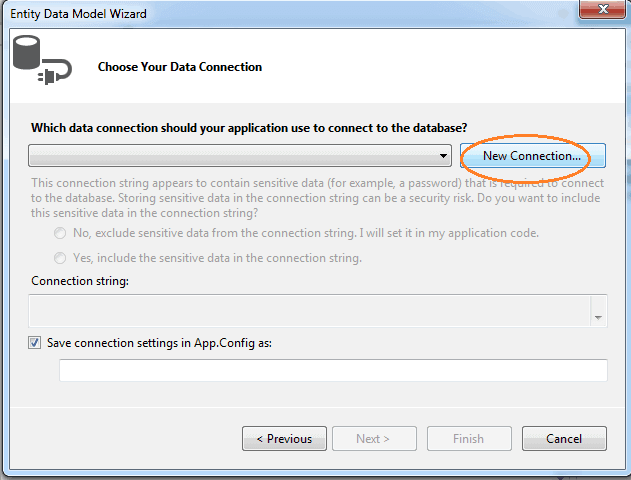
The Next dialog box is Choose your data connection. Click on New Connection
In Choose Data Source Dialog box select Microsoft SQL Server and click on Continue
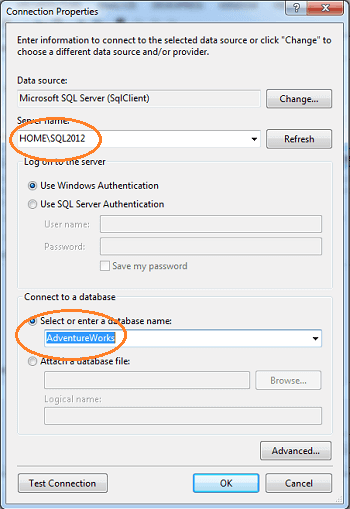
In Connection Properties Dialog box to enter
- Server Name
- Log On Credentials
- Select the Database Name
- Click on OK once finished
This will take you to Choose your data connection wizard. The Connection we just created now appears in the drop-down. Check the “Save the Connection settings in App.Config as” box. Click on Next
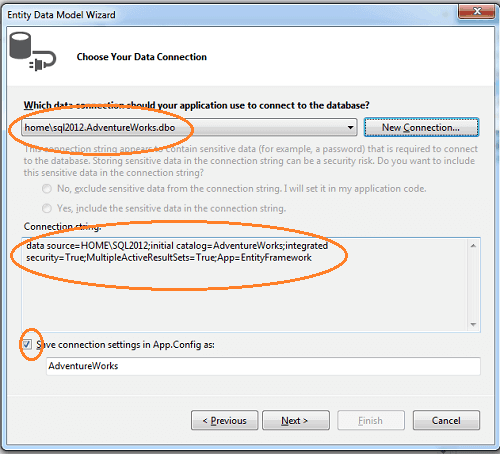
You are taken to the Choose your database objects and settings dialogue box as shown in the image below
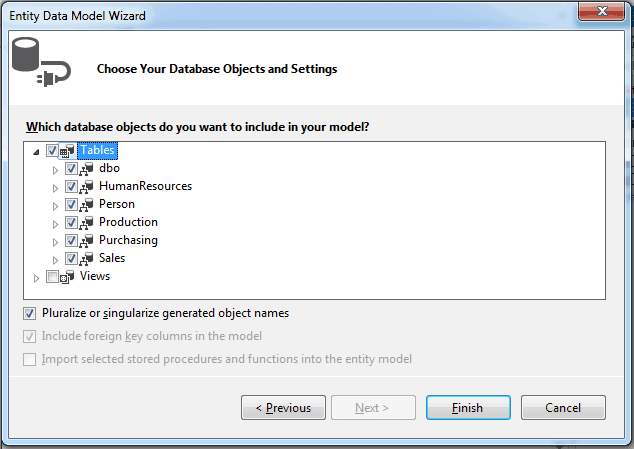
Select the tables & Views you want to be in your model and click on Finish. Build the solution to check if there are any errors
Reverse Engineer Code First
The Reverse engineer process generates all the required plumbings to get us started with the existing database. It creates the Connection string, models, and context classes. Let us examine each of them in details
The Connection string in App.Config
The Code First Reverse engineer wizard will generate the Connection string and adds it your App.Config file. If you open your App.Config you will see the following connection string. Connection string may differ depending on the version of SQL Server being used.
1 2 3 4 5 | <connectionstring> <add name="AdventureWorks" connectionString="data source=HOME\SQL2012;initial catalog=AdventureWorks;integrated security=True;MultipleActiveResultSets=True;App=EntityFramework" providerName="System.Data.SqlClient" /> </connectionStrings> |
Models
The Models class are generated one for each table under the folder models. Data Annotations attributes are also applied to these classes. The following is the generated code for the Customer model
1 2 3 4 5 6 7 8 9 10 11 12 13 14 15 16 17 18 19 20 21 22 23 24 25 26 | [Table("Sales.Customer")] public partial class Customer { [System.Diagnostics.CodeAnalysis.SuppressMessage("Microsoft.Usage", "CA2214:DoNotCallOverridableMethodsInConstructors")] public Customer() { SalesOrderHeaders = new HashSet<SalesOrderHeader>(); } public int CustomerID { get; set; } public int? PersonID { get; set; } public int? StoreID { get; set; } public int? TerritoryID { get; set; } [DatabaseGenerated(DatabaseGeneratedOption.Computed)] [Required] [StringLength(10)] public string AccountNumber { get; set; } public Guid rowguid { get; set; } public DateTime ModifiedDate { get; set; } public virtual Person Person { get; set; } public virtual SalesTerritory SalesTerritory { get; set; } public virtual Store Store { get; set; } [System.Diagnostics.CodeAnalysis.SuppressMessage("Microsoft.Usage", "CA2227:CollectionPropertiesShouldBeReadOnly")] public virtual ICollection<SalesOrderHeader> SalesOrderHeaders { get; set; } } |
Context
You will also find the context class AdventureWorks.cs is added to the folder models. Fluent API is used in OnModelCreating method to set up relationships between entities
Test the Application
Finally, we can test our application by querying the person table and listing out its content. The code is as shown below.
1 2 3 4 5 6 7 8 9 10 11 12 13 14 15 16 17 | class Program { static void Main(string[] args) { using (var ctx = new models.AdventureWorks()) { var People = ctx.People.ToList(); foreach (var person in People) { Console.WriteLine(string.Format("{0} {1}", person.FirstName, person.LastName)); } } Console.ReadLine(); } } |
Run this program and you should see the list of all the person
Conclusion
The Above process demonstrates how we can create the code first entity models from the existing database. In case if your database changes then you can manually change the classes or run the reverse engineer process again to generate the model classes


